DIY 20×20 Paver Patio True Material and Tool Costs

DIY 20×20 Paver Patio True Material and Tool Costs
How Much Does a 20×20 Paver Patio Cost DIY in 2026?
Building your own outdoor living space is a rewarding project, but getting the budget right from the start is essential. If you are calculating how much does a 20×20 paver patio cost diy, the realistic price range sits between $2,800 and $9,000 in 2026. Because a 20×20 patio encompasses a generous 400 square feet, your overall material and equipment expenses average out to approximately $5 to $12 per square foot.
Where your project lands within this spectrum depends largely on your choice of paving units, the depth of your excavation, and whether you already own basic site-prep equipment. To plan your numbers accurately alongside broader market rates, reviewing current data in our Paver Patio Cost 2026 breakdown can give you a clear baseline.
How Much Does a 20×20 Paver Patio Cost DIY vs Professional Installation?
When you tackle a patio build yourself, you eliminate direct labor costs, which usually account for 40% to 60% of a professional contractor’s total invoice. A professionally installed 400-square-foot paver patio generally ranges from $6,500 to $14,000 (roughly $16 to $35 per square foot), and complex architectural installations can climb beyond $20,000.
By handling the physical excavation, hauling, leveling, and paving on your own, you can save between $3,700 and $7,500 in labor fees. However, professional pricing accounts for specialized excavation machinery, commercial-grade compaction tools, dump fees, and structural guarantees. Even with the DIY approach, pavers offer an impressive return on investment—often adding 30% to 69% of project costs back into home resale appeal. You can explore how hardscaping assets improve property equity in our guide on how Do Pavers Increase Home Value.
Regional Soil and Climate Price Factors
Material and base requirements fluctuate noticeably depending on your geographic region and native soil structure. Soil with heavy clay retains water and expands, requiring a deeper subbase layer (often 6 to 8 inches of compacted crushed rock) compared to sandy, well-draining soil (4 to 6 inches).
- Freeze-Thaw Climates (Northeast / Midwest): Require deeper excavation to sit below the local frost depth, driving up gravel base volume and overall spend by 10% to 25%.
- Temperate & Arid Zones (West Coast / South): Standard 4-inch aggregate subbases are typically sufficient for foot traffic, keeping excavation and disposal costs lower.
- Permits and Drainage Codes: Ground-level residential patios rarely require permits, but if your build ties into retaining structures or alters municipal stormwater runoff paths, permit fees can add $150 to $500.
Understanding these structural site needs helps answer the question of Why Do Pavers Cost So Much when engineered for decades of stability.
Complete Material Cost Breakdown for a 400 Sq Ft Patio
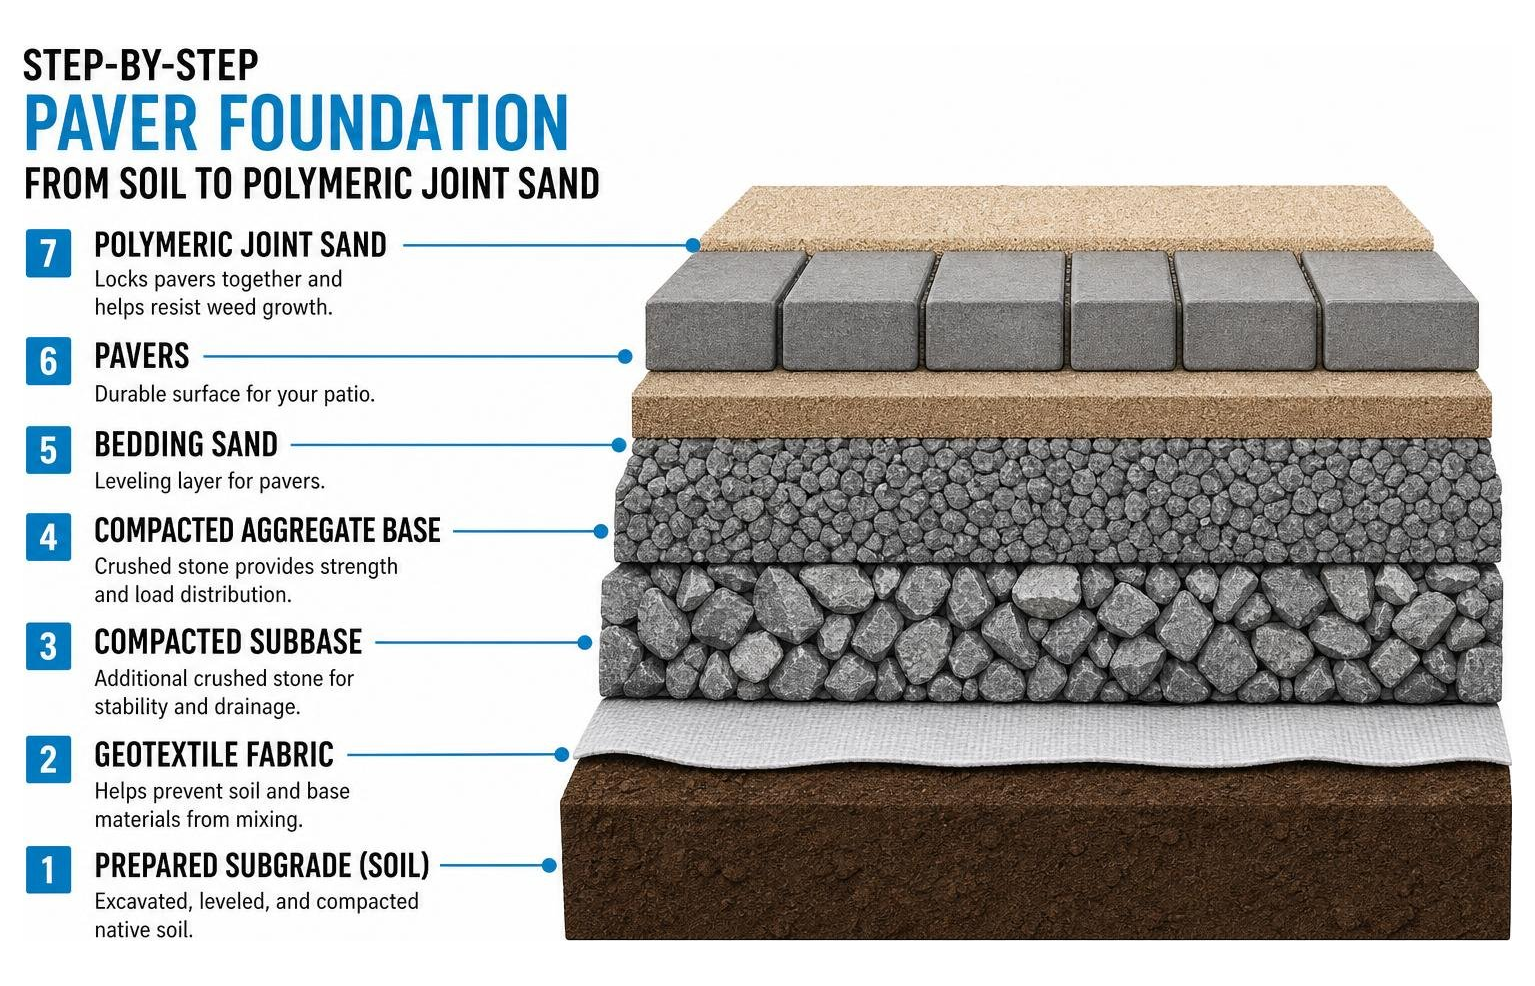
A stable patio requires a layered foundation system. The visible paving stones make up only part of your receipt; the subgrade preparation, aggregate foundation, bedding sand, and edge stabilization form the true structural system.
Paver Material Selection and Pricing
Selecting the proper unit surface impacts aesthetics, longevity, and overall budget:
- Concrete Pavers: Costing between $2.20 and $6.50 per square foot, standard manufactured units provide uniform thickness, making them simple to set level.
- Interlocking Pavers: Ranging from $3.50 to $8.00 per square foot, their engineered geometric spacers ensure straight joint lines and reliable load distribution.
- Brick Pavers: Costing $4.00 to $9.00 per square foot, kiln-fired clay units offer classic color retention that will not fade over time.
- Natural Stone & Porcelain: Ranging from $8.00 to $18.00+ per square foot, natural flagstone, bluestone, or exterior-rated porcelain tiles provide upscale elegance but demand precise cutting skills. Check out our comparative analysis on Natural Stone vs Porcelain Pavers Which is Better to weigh maintenance against upfront investment.
For deeper insights into matching surface patterns with outdoor living habits, review our guide on How to Choose the Best Pavers for Your Patio.
Base Layers, Sand, and Edge Restraints
A complete 400-square-foot patio requires several essential sub-surface materials:
- Geotextile Fabric (450–500 sq ft roll): $60 to $120. Separates native soil from aggregate, preventing your patio base from slowly sinking into muddy subgrade.
- Class 2 Crushed Base Rock (4 to 6 inches deep): 6 to 9 cubic yards (approx. 8 to 12 tons). Costs run $350 to $650 delivered in bulk.
- Washed Concrete Sand / Bedding Sand (1 inch deep): 1.5 to 2 cubic yards (approx. 2 to 3 tons). Costs run $100 to $200.
- Snap-Edge Heavy Duty Restraints & Spikes: 80 linear feet of commercial edge restraint with 10-inch steel spikes costs $120 to $220.
- Polymeric Joint Sand: 3 to 4 bags (50 lbs each) of polymeric sand run $90 to $180, locking joints together while deterring weed growth and insect intrusion.
Proper subgrade planning is crucial; make sure to read through our checklist on Paver Installation Preparation before scheduling bulk material deliveries.
Material Comparison: DIY 20×20 Patio Options
Always order 10% extra material (or 15% to 20% for herringbone or diagonal layouts) to accommodate border cuts, edge trimming, and broken stones.
| Paver Type | Material Cost (400 sq ft + 10% overage) | Base, Sand & Edging Materials | DIY Installation Difficulty | Expected Lifespan |
|---|---|---|---|---|
| Standard Concrete | $968 – $2,860 | $720 – $1,370 | Beginner / Moderate | 25 – 35 Years |
| Interlocking Concrete | $1,540 – $3,520 | $720 – $1,370 | Moderate | 30 – 50 Years |
| Clay Brick | $1,760 – $3,960 | $720 – $1,370 | Moderate | 40 – 60+ Years |
| Porcelain Tile | $3,520 – $6,600 | $850 – $1,550 | Advanced | 40 – 50+ Years |
| Natural Stone (Bluestone/Slate) | $3,520 – $7,920 | $850 – $1,650 | Advanced (variable thickness) | 50+ Years |
Essential Tool and Equipment Costs for DIY Installation
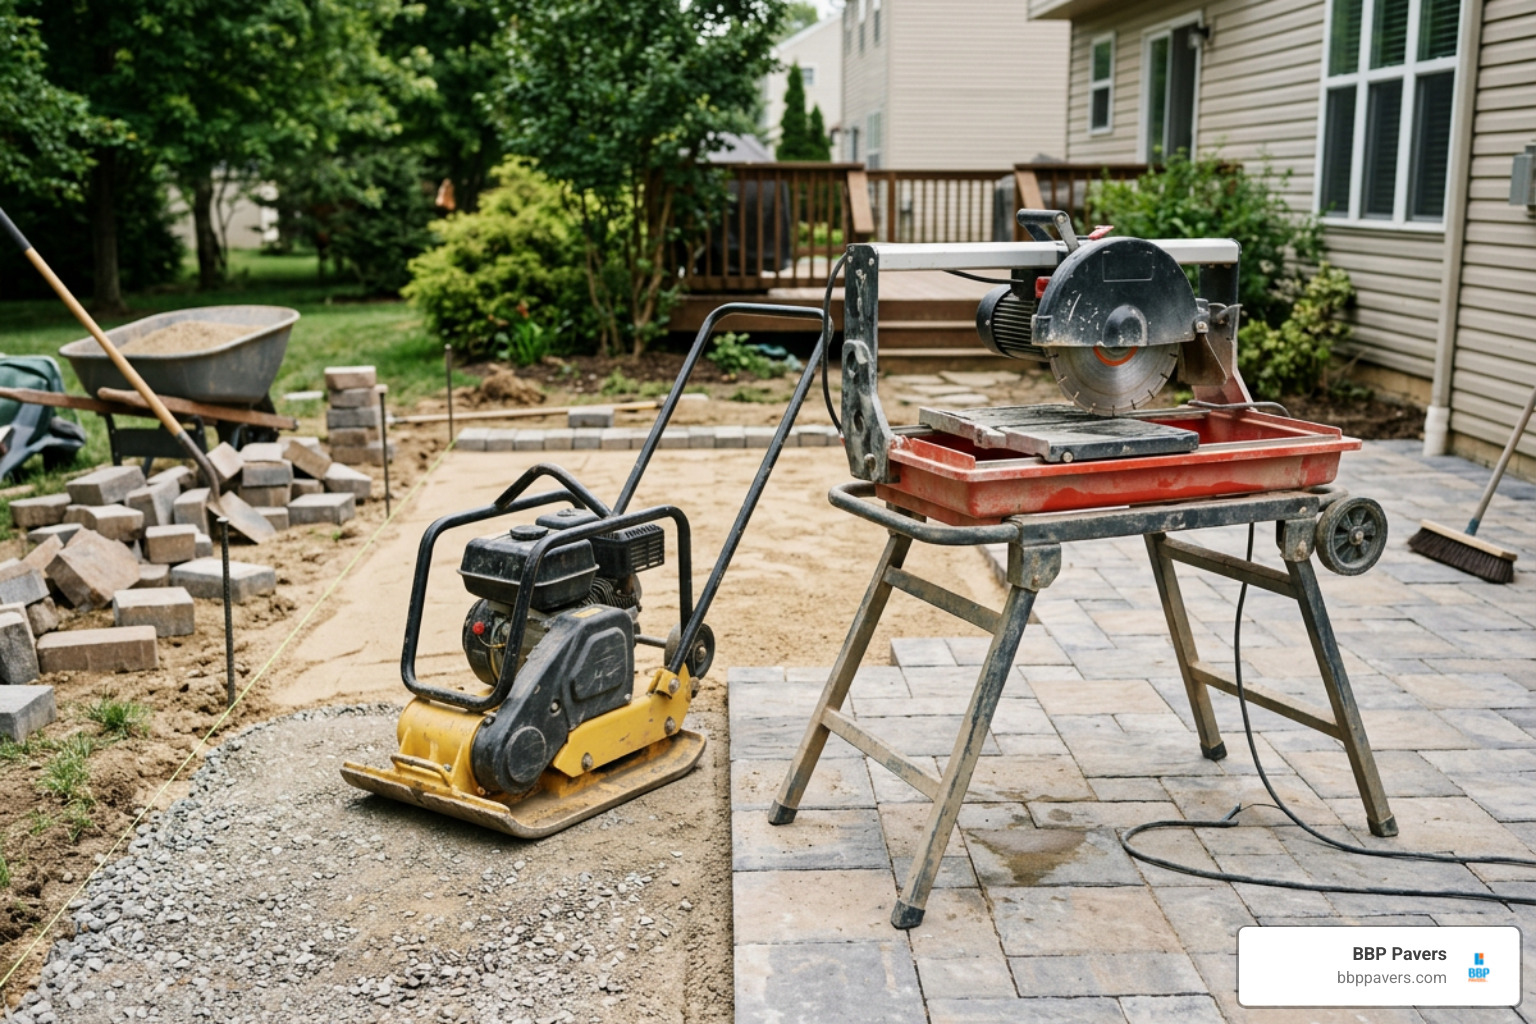
A quality paver installation relies on the right compaction and cutting tools. Trying to pack down 10 tons of gravel base by hand with an 8×8-inch manual tamper will quickly exhaust your energy and often leaves soft spots that cause settlement later.
Heavy Equipment Rental vs Purchase
Renting high-powered machinery for a single weekend is far more practical than buying it:
- Vibratory Plate Compactor: A gas-powered, 3,000-to-4,000-lb centrifugal force compactor rents for $75 to $110 per day or $160 to $260 for a full weekend. It is vital for seating the crushed aggregate base in 2-inch lifts and settling the pavers into the bedding sand.
- Wet Diamond Masonry Saw: Renting a 12-inch or 14-inch slide masonry saw runs $65 to $95 per day. It yields clean, splinter-free perimeter cuts. For safety procedures and cutting techniques, refer to our walkthrough on How to Cut Pavers.
Hand Tools, Levels, and Safety Supplies
In addition to heavy rentals, set aside a modest budget for practical accessories:
- Screeding Kit: Two 10-foot lengths of 1-inch outside-diameter metal electrical conduit (EMT pipe) and a straight aluminum screed board or premium 2×4 ($35–$60).
- Alignment Tools: Non-elastic mason’s string line, line level, wooden line stakes, and a 48-inch spirit level ($40–$75).
- Setting Tools: Deadblow rubber mallet (16–24 oz), square shovel, steel garden rake, push broom ($70–$120).
- Personal Protective Equipment: High-grade knee pads, ballistic eye protection, heavy-duty work gloves, and ear protection ($35–$65).
Key Steps and Hidden Mistakes That Increase Costs
The steps for laying a patio are straightforward, but skipping minor details can cause expensive problems down the road. Take time to study How to Lay Pavers and keep these practical building practices in mind:
- Inadequate Excavation Depth: A 20×20 patio requires excavating 7 to 9 inches below final grade (4 to 6 inches of base rock + 1 inch of bedding sand + 2 to 2.375 inches of paver thickness). Under-excavating leaves the patio sitting awkwardly high against home thresholds or lawn edges.
- Ignoring Slope and Pitch: Failing to establish a minimum pitch of 1/4-inch drop per 10 linear feet away from your home’s foundation invites standing puddles and water intrusion.
- Disturbing the Bedding Sand Layer: Never use a plate compactor directly over loose, unpaved screed sand, and avoid walking directly on your leveled sand bed before setting pavers.
- Omitting Edge Restraints: Without rigid edge restraints secured into undisturbed base gravel, the perimeter stones will push outward, spreading the joint lines across your entire patio.
Review our breakdown of 5 Paver Installation Mistakes to Avoid for a Perfect Finish to steer clear of premature patio failure.
How Base Preparation Affects the DIY Budget
Your foundation makes up 30% of your material expenses and 70% of your physical effort. Skipping deep excavation or shorting your base material to save a few hundred dollars is the most common reason DIY patios fail.
When moisture enters poorly compacted subsoils, winter frost heaves and seasonal saturation create sunken low spots. Rebuilding a settled patio requires lifting all 400 square feet of pavers, scraping out contaminated sand, and purchasing new gravel. Following the correct process outlined in How to Install Pavers protects your investment from the ground up.
Practical Strategies to Lower Your Total Spend
- Order Aggregate and Sand in Bulk: Buying bagged base materials from big-box stores can cost 3 to 4 times more than purchasing in bulk from a local landscape supply yard.
- Keep the Layout Rectangular: A square 20×20 footprint minimizes edge cuts. Curved perimeters require trimming almost every border paver, which increases cutting time, blade wear, and material scrap rates.
- Organize Weekend Tool Rentals: Have your excavation finished and your aggregate base shoveled in place before picking up the compactor and saw. This allows you to rent the equipment for just 24 to 48 hours instead of keeping it for an entire week.
Frequently Asked Questions About 20×20 Paver Patio Costs
What is the most cost-effective paver material for a 20×20 DIY patio?
Standard dry-cast concrete pavers are by far the most budget-friendly option, averaging $2.20 to $6.50 per square foot for materials. They are uniform in size, simple to screed flat, and handle moderate freeze-thaw cycles without breaking down.
While poured concrete slabs carry a lower initial price tag, interlocking pavers eliminate long-term surface cracking because the joint network naturally absorbs ground movement. For a closer look at these two surfaces, read our side-by-side analysis of Pavers vs Concrete Durability and Aesthetics for Outdoor Spaces.
How many labor hours does a DIY 20×20 paver patio take?
A DIY 20×20 (400 sq ft) paver patio typically requires 40 to 80 total labor hours. For two capable adults working together, this translates to roughly two to three full weekends:
- Weekend 1: Site layout, utility marking, manual or mini-skid excavation, and laying geotextile fabric (16–24 crew hours).
- Weekend 2: Hauling, leveling, and compacting 8 to 12 tons of aggregate base in 2-inch lifts (16–24 crew hours).
- Weekend 3: Setting screed pipes, spreading 1 inch of bedding sand, laying pavers, cutting perimeter borders, installing snap-edge restraints, sweeping polymeric sand, and final compaction (18–30 crew hours).
How long will a properly installed DIY paver patio last?
When built on a well-compacted, free-draining aggregate base, a residential paver patio will last 30 to 50 years or more. Maintenance is simple: rinse off seasonal debris, top up the polymeric joint sand every 3 to 5 years, and apply a breathable, penetrating concrete sealer every 2 to 3 years to preserve color and resist barbecue grease or leaf stains.
Conclusion
Building your own 20×20 paver patio is an achievable DIY project that can save you thousands of dollars in contractor labor. With a total budget between $2,800 and $9,000, you can turn an underutilized yard into an inviting 400-square-foot outdoor living space built to last for decades. The secret to long-term success lies beneath the surface: never cut corners on excavation depth, subbase compaction, or sturdy edge restraints.
If heavy site grading, tricky access, or limited free time make a self-build challenging, partnering with an experienced hardscape specialist ensures peace of mind. At BBP Pavers, we bring over 20 years of Bay Area expertise to every design, providing premium materials, safety-first installation, and a 100% satisfaction guarantee.
Check our detailed breakdown of Paver Patio Installation Cost to compare custom design options, or reach out to our team today for a free, zero-obligation project estimate!