How to Construct Durable Front and Patio Steps Using Pavers

Planning and Designing Paver Steps: Rise, Run, and Codes
To construct durable outdoor steps using pavers, excavate the step footprint, compact a 6-inch crushed stone base over geotextile fabric, and set level structural riser blocks bonded with hardscape adhesive. Next, backfill each tier with dense aggregate, screed a 1-inch bedding sand layer, and secure tread pavers with a 1/4-inch per foot outward drainage slope before filling joints with polymeric sand.
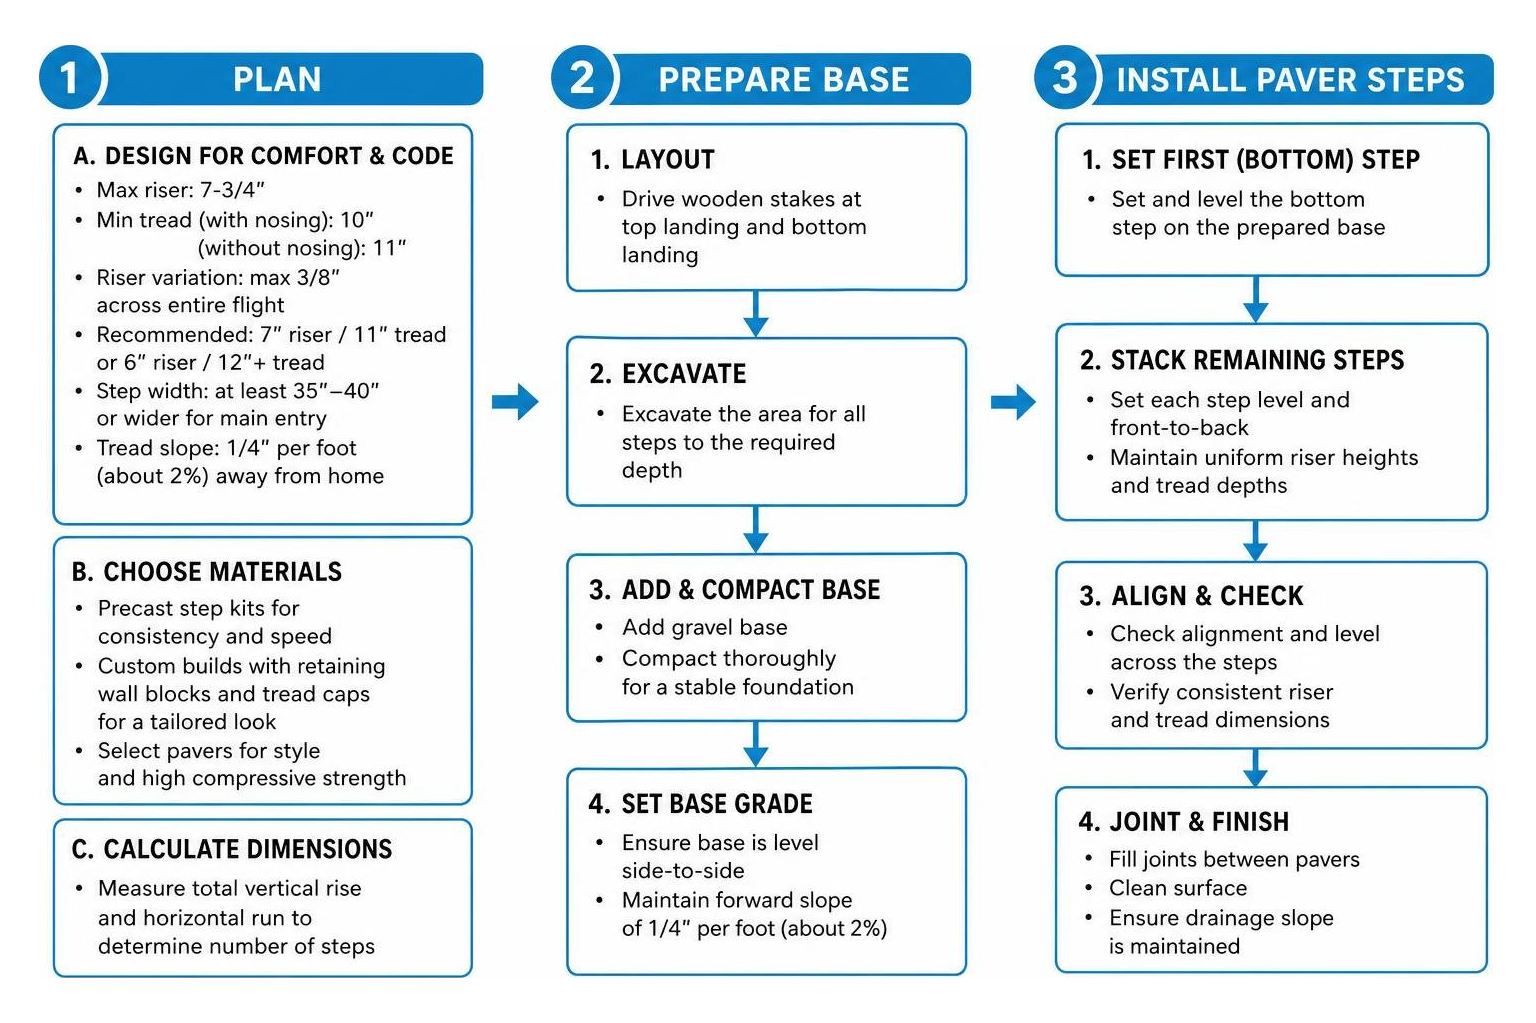
Planning outdoor stairs also requires balancing comfort, visual balance, and safety standards. The International Residential Code (IRC) sets strict boundaries for residential stairways: the maximum riser height is typically capped at 7-3/4 inches, while the minimum tread depth is 10 inches with a nosing (or 11 inches without one). Across the entire flight, riser heights should not vary by more than 3/8 inch. Even a slight variation in height creates a subconscious rhythm disruption for your feet, turning a simple walk up to your front porch into a trip hazard.
Many experienced landscapers rely on the classic “7/11 rule” (a 7-inch riser paired with an 11-inch tread) or lean toward garden-friendly dimensions of a 6-inch riser with a 12-inch or deeper tread. For comfortable foot traffic, we recommend designing step treads with a width of at least 35 to 40 inches—or wider if the steps serve as the primary entryway from your driveway or patio.
Every step tread also needs built-in drainage. Always build in a forward slope of roughly 1/4 inch per foot (about a 2% grade) away from your home or foundation. This prevents rainwater from pooling on the step surface or seeping backward toward structural walls.
When deciding on materials, you can choose between dedicated precast step kits or custom field paver builds. Modular step units offer factory-measured consistency that speeds up construction, while custom builds let you mix retaining wall blocks with coordinating tread caps for a tailored look. Taking the time to understand how to select pavers for your project ensures your chosen stones complement your existing architectural style while delivering high compressive strength.
Calculating Step Dimensions for Proper Ergonomics
To determine how many steps your project requires, measure the total vertical rise and horizontal run of your slope before picking up a shovel.
- Drive a wooden stake at the top of the planned landing and another stake at the bottom landing point.
- Tie a sturdy string line between the two stakes and level it using a line level.
- Measure vertically from the ground at the bottom stake up to the level string. This distance is your Total Rise.
- Measure horizontally along the level string between the two stakes. This is your Total Run.
To calculate the number of steps:
- Divide your Total Rise by your target riser height (e.g., 6 inches). If your total rise is 24 inches, 24 ÷ 6 = 4 risers.
- If the math results in a fraction (such as 26 ÷ 6 = 4.33), round to the nearest whole number (4 steps) and recalculate: 26 ÷ 4 = 6.5 inches per riser.
- Your number of treads will be one less than the number of risers if the top step transitions flush into a porch or patio landing.
| Total Rise (Inches) | Number of Risers | Individual Riser Height | Individual Tread Depth | Recommended Slope Pitch |
|---|---|---|---|---|
| 12″ – 14″ | 2 | 6.0″ – 7.0″ | 11.0″ – 14.0″ | 1/4″ per foot (forward) |
| 18″ – 21″ | 3 | 6.0″ – 7.0″ | 11.0″ – 13.0″ | 1/4″ per foot (forward) |
| 24″ – 28″ | 4 | 6.0″ – 7.0″ | 11.0″ – 12.0″ | 1/4″ per foot (forward) |
| 30″ – 35″ | 5 | 6.0″ – 7.0″ | 11.0″ – 12.0″ | 1/4″ per foot (forward) |
Materials and Essential Tools for Building Steps with Pavers
Sturdy steps require heavy-duty materials designed to handle continuous load and shifting ground moisture:
- Riser Wall Blocks: Concrete retaining wall blocks or solid split-face blocks to form the structural riser frames.
- Tread Pavers or Coping: Bullnose coping units, natural stone treads, or thick architectural concrete pavers.
- Base Aggregate: Dense-grade 3/4-inch minus crushed stone or gravel with fines (such as road base or quarry process).
- Bedding Sand: Coarse, washed concrete sand meeting ASTM C33 standards (avoid fine masonry sand or play sand).
- Joint Stabilizer: High-performance polymeric sand.
- Adhesive: Heavy-duty polyurethane hardscape construction adhesive.
- Geotextile Fabric: Woven or non-woven landscape separation fabric.
- Core Tools: Plate compactor (or heavy hand tamper), 4-foot carpenter’s level, torpedo level, rubber mallet, string line, line level, diamond blade wet saw or masonry angle grinder, caulking gun, and personal protective equipment.
Step-by-Step Guide to Building Steps with Pavers
Base preparation accounts for roughly 80% of any hardscape project’s long-term success. If you take shortcuts below the surface, the steps will settle, separate, or wobble over time. Following proper paver installation preparation ensures a durable build that resists freeze-thaw cycles and ground settling.
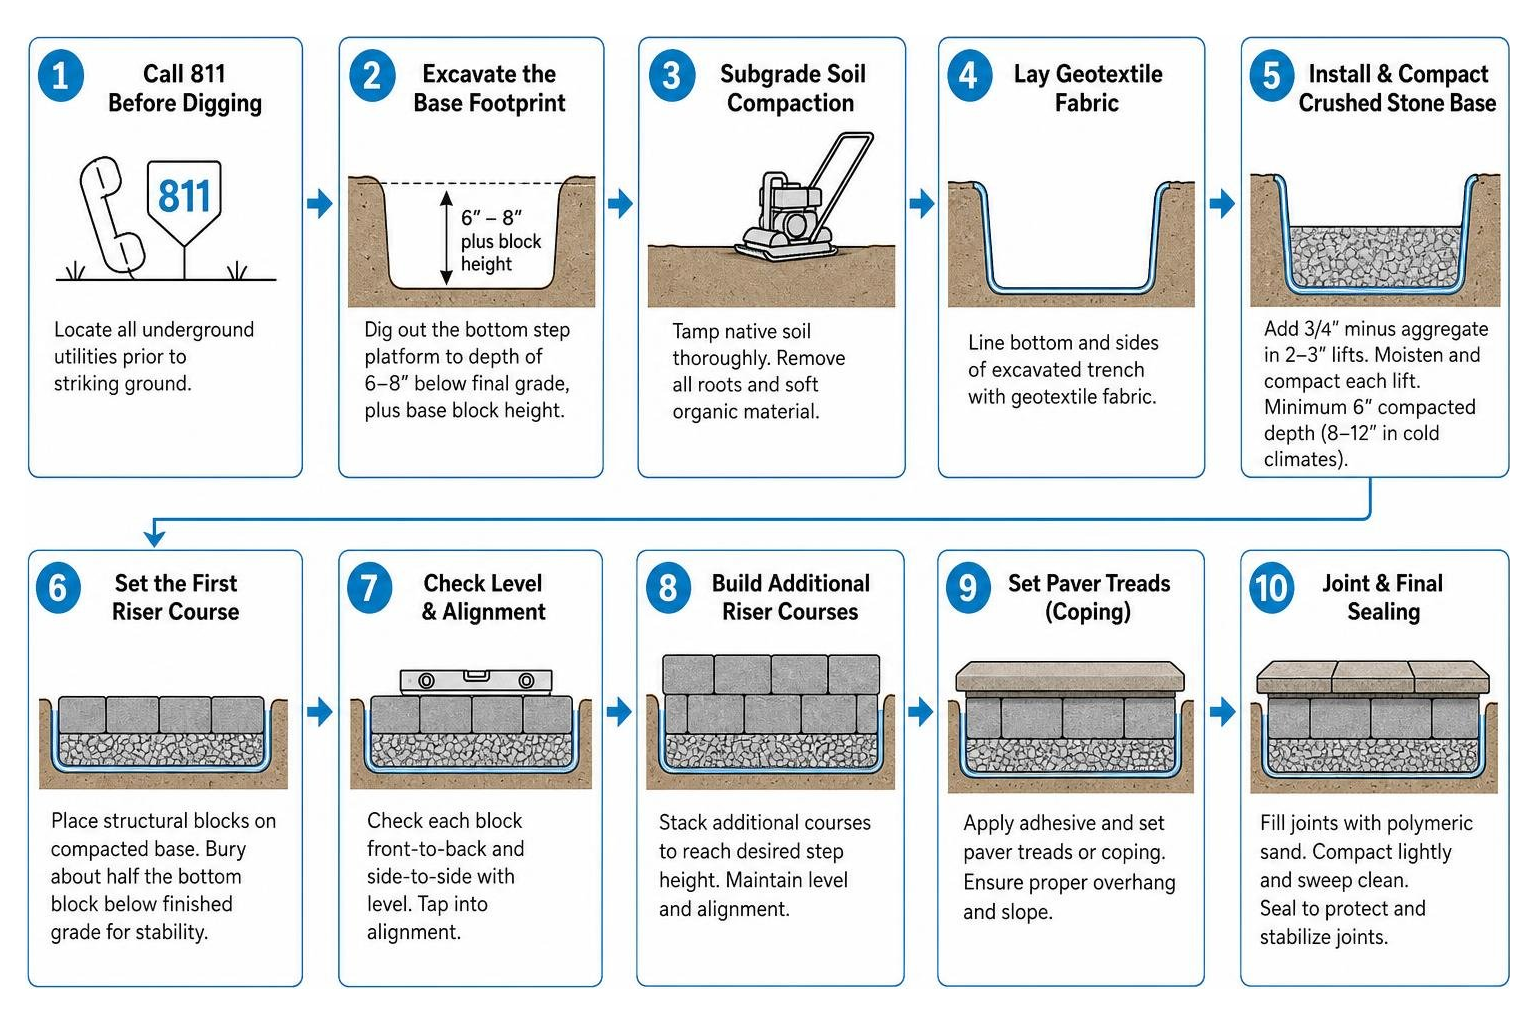
- Call 811 Before Digging: Locate all underground utilities prior to striking ground.
- Excavate the Base Footprint: Dig out the footprint of the entire bottom step platform to a depth of 6 to 8 inches below final grade, plus the height of your embedded base block. If you are building a terraced flight, dig stepped trenches that match the run of each tier.
- Subgrade Soil Compaction: Tamp the native soil thoroughly using a mechanical plate compactor or hand tamper. Remove all roots and soft organic material.
- Lay Geotextile Fabric: Line the bottom and sides of the excavated trench with geotextile fabric to keep the subsoil from mixing into the gravel base.
- Install and Compact Crushed Stone Base: Add your 3/4-inch minus dense aggregate in 2- to 3-inch layers (lifts). Moisten each lift lightly and run the plate compactor over it several times. Build a minimum compacted foundation depth of 6 inches for standard residential applications. In regions subject to deep freeze-thaw cycles, increase base thickness to 8 to 12 inches.
Laying Risers and Cutting Paver Treads
Once the gravel foundation is level and solid, start building upward from the bottom tier:
- Set the First Riser Course: Place your structural retaining wall blocks on the compacted base, burying about half of the bottom block’s height below finished grade for stability. Check each block front-to-back and side-to-side with your level. Tap them into alignment with a rubber mallet.
- Backfill and Lock the Core: Fill behind the first riser row with dense aggregate, compacting it thoroughly until it is level with the top of the riser blocks (minus the thickness of your bedding layer and pavers).
- Secure the Cap and Risers with Adhesive: Apply two continuous 1/4-inch beads of exterior-grade polyurethane hardscape adhesive along the top surface of the riser blocks before setting coping stones or tread pavers.
- Add Bedding Sand: For inset paver step treads, screed a 1-inch layer of dry, coarse ASTM C33 sand over the compacted backfill behind the riser blocks. Do not use excessive bedding sand to correct height errors; keep it at a uniform 1 inch.
- Place the Tread Pavers: Position tread stones firmly onto the bedding sand, maintaining consistent 1/8-inch to 3/16-inch joint gaps. Ensure the tread extends over the riser slightly (often 1/2 inch to 1 inch if using bullnose coping) to create an attractive overhang nosing.
- Precision Cutting: Use a wet tile saw or an angle grinder fitted with a diamond blade to make clean edge cuts. To protect your hands and eyes, review these practical safety tips on how to cut pavers before trimming borders or soldier course perimeter blocks.
Building Steps with Pavers on Hillsides and Slopes
Building on an open hillside requires managing water runoff and soil pressure. Instead of digging out the entire slope at once, carve individual terraces directly into the natural incline from bottom to top.
- Cut each shelf flat into the hillside, making sure the subgrade of each upper tier rests on virgin, undisturbed soil rather than uncompacted fill.
- Set pressure-treated timber stakes or embed the bottom concrete block course deeply into the hillside to act as an anchor.
- Backfill the area behind every riser wall with clean, open-graded gravel to relieve hydrostatic water pressure against the back of the steps.
- If connecting garden paths to upper outdoor spaces, complement your steps with functional walkway pavers that follow natural landscape contours while maintaining stable edge support.
Securing, Edging, and Finishing Paver Steps
Without proper lateral support, foot traffic and seasonal ground expansion will push outer pavers outward. According to the Interlocking Concrete Pavement Institute (ICPI), perimeter edge restraints are essential for structural stability.
For steps, you can secure borders using heavy-duty commercial plastic edging anchored with 10-inch steel landscape spikes, or by creating a hidden concrete toe-kick (a 45-degree troweled concrete wedge) behind the riser blocks. For wider landings, mortar-set soldier courses provide clean borders that keep interior field pavers firmly contained. If your new steps integrate directly into an expansive entertainment area or patio, pairing them with matching patio pavers helps unify your entire backyard design.
Polymeric Sand and Surface Sealing
The final steps lock your pavers together and protect the stone from environmental wear:
- Ensure Completely Dry Surfaces: Wait for a window of dry weather. Moisture on the paver surface will activate polymeric sand prematurely, leaving stubborn white haze marks across your stones.
- Sweep Sand into Joints: Pour polymeric sand over the steps and work it into the gaps with a push broom.
- Consolidate the Joints: Tap the treads gently with a rubber mallet, or run a plate compactor equipped with a protective rubber mat over broad landings, to vibrate the sand deep into the joints. Sweep in additional sand until joints are filled to within 1/8 inch below the paver chamfer edge.
- Blow Off Excess Sand: Use a leaf blower on its lowest idle setting to clear every trace of stray sand and dust from the paver faces.
- Mist to Activate: Using a garden hose nozzle set to a fine mist, spray the steps for roughly 20 to 30 seconds per section. Allow the water to soak in for a few minutes, then mist a second and third time. Avoid high-pressure spraying, which washes the binder out of the joints.
- Apply Protective Sealer: Allow the polymeric sand to cure undisturbed for at least 30 to 60 days. After this curing window and after any natural efflorescence (salt residue) dissipates, review the proper application methods for how to seal pavers. Quality breathable sealers enhance color richness and protect against oil, food, and moss stains.
Common Paver Step Mistakes and Troubleshooting
Building stairs requires precise attention to detail. Avoid these frequent hardscape mistakes:
- Inconsistent Riser Heights: Even a 1/2-inch height difference between steps creates an awkward stride and a recurring trip hazard. Recheck your measurements across every single tier before adhering blocks.
- Skipping Subbase Compaction: Rushing through excavation or failing to run a plate compactor over gravel lifts leads to uneven settling within the first year. For a smooth build, review these 5 paver installation mistakes to avoid for a perfect finish.
- Omitting the Drainage Slope: Level treads cause puddles that freeze into dangerous ice sheets in winter. Keep a consistent 1/4-inch-per-foot outward pitch on every tread surface.
- Using Fine Masonry or Play Sand for Bedding: Fine sand washes out with water flow and shifts under foot traffic. Stick strictly with coarse, angular ASTM C33 sand.
- Applying Construction Adhesive to Wet Blocks: Polyurethane hardscape adhesives need clean, dry surfaces to create a permanent structural bond. Dry damp blocks thoroughly before applying adhesive.
Frequently Asked Questions About Building Paver Steps
How long do paver steps last compared to poured concrete?
When installed on a compacted, well-drained gravel base, brick and concrete paver steps typically last 25 to 50 years or more. Unlike monolithic poured concrete—which often develops structural cracks as the ground settles or shifts during freeze-thaw cycles—interlocking paver systems flex naturally with minor ground movement. If an individual stone chips, stains, or settles, it can be lifted and reset without having to demolish the entire staircase.
What is the estimated cost to build paver steps DIY vs hiring a professional?
For a hands-on homeowner tackling a DIY installation, material costs generally run between $15 and $35 per square foot of finished step surface (accounting for base rock, sand, structural blocks, caps, adhesive, and polymeric sand). If you need to rent equipment like a diamond wet saw or plate compactor, plan for an additional $75 to $150 per day.
Professional installation by an experienced hardscape contractor generally ranges from $50 to $150+ per square foot, depending on site accessibility, demolition requirements, slope grading, and the choice of premium materials. To see how step and patio work fits into a broader hardscape budget, check out our guide on paver patio installation cost.
Can you build paver steps directly over existing concrete steps?
Yes, you can overlay sound concrete stairs with pavers, provided the underlying concrete is structurally stable, free of major settling cracks, and properly sloped. Clean the concrete thoroughly to remove dirt and algae, apply a bonding agent if needed, and secure the perimeter risers and treads directly to the concrete using heavy-duty polyurethane hardscape adhesive. Make sure that adding paver thickness does not block door thresholds, alter home siding clearances, or create an uneven bottom or top step height.
Step Up Your Home’s Curb Appeal
Building sturdy paver steps adds lasting structural value, reliable safety, and refined curb appeal to your entryway, patio, or garden hillside. With careful rise-and-run calculations, a deep compacted aggregate base, and high-performance jointing materials, your outdoor stairs will easily stand up to decades of daily foot traffic and seasonal weather.
If you are expanding your outdoor living space with connecting paths, entries, or driveways, explore our comprehensive guide on how to install pavers for detailed hardscaping techniques.
When you want expert craftsmanship without the heavy lifting, the team at BBP Pavers is here to help. With over 20 years of local Bay-Area hardscaping expertise, premium materials, safety-focused installations, and a 100% satisfaction guarantee, we build front entries, patios, and custom staircases built to last. Contact BBP Pavers today for your free design consultation and quote!