How to Cut Pavers: A Step-by-Step Guide for Perfect Cuts
Pavers are a versatile and popular choice for various outdoor projects. Whether you’re creating a patio, walkway, or driveway, achieving precise and clean cuts is crucial to ensure a professional-looking result. If you’re wondering how to cut pavers effectively, this step-by-step guide will walk you through the process. From the tools you’ll need to safety precautions and cutting techniques, we’ll cover everything you need to know to achieve perfect cuts.
Introduction to Cutting Pavers
Cutting pavers allows you to customize them to fit specific areas and create intricate designs. It gives you the flexibility to adjust the size and shape of the pavers to accommodate curves, corners, and other unique features in your project. But before you get started, it’s essential to understand the tools and equipment you’ll be working with and take necessary safety precautions.
Understanding the Tools and Equipment
To answer the question, “What tool do you use to cut pavers?” the most commonly used tool for cutting pavers is a wet saw, which uses a diamond blade and water to create clean and precise cuts. Alternatively, you can use an angle grinder with a diamond blade for curved cuts or a chisel and hammer for manual cutting. Each tool has its advantages and considerations, depending on the complexity of your project and the desired outcome.
Safety Precautions for Cutting Pavers
Before you start cutting pavers, it’s important to prioritize safety. Always wear appropriate safety gear, including safety glasses, gloves, and ear protection, to protect yourself from flying debris and loud noises. To answer the question, “Can you cut pavers without a saw?” it’s recommended to use proper cutting tools for accurate and efficient results. However, if you choose to cut pavers manually with a chisel and hammer, ensure you follow safe practices and use caution.
Step 1: Marking and Measuring the Pavers
Before cutting pavers, accurate measurements and markings are crucial for achieving precise cuts. Start by answering the question, “How do you cut brick pavers by hand?” by marking the paver’s desired cut line using a pencil or chalk. If you’re making multiple cuts, use a straight edge or a template to ensure consistency. Measure the dimensions carefully and double-check your markings before proceeding to the cutting phase.
Tools and Techniques for Accurate Measurements
To achieve accurate measurements and answer the question, “What tool do you use to cut pavers?”, use a tape measure or a combination square to measure and mark the desired cut lines. A straight edge or a level can help ensure that your lines are straight and aligned correctly. Consider using a speed square or angle finder for angled cuts. Taking the time to measure and mark accurately will save you from potential mistakes and wasted materials.
Choosing the Right Cutting Method
Depending on the complexity of your project and the type of cuts required, you’ll need to choose the appropriate cutting method. Answering the question, “Can you cut pavers with a grinder?” Yes, an angle grinder with a diamond blade is a suitable tool for cutting pavers, especially for curved cuts or notches. However, for straight cuts and more precise results, a wet saw is recommended. Answering the question, “What is the most expensive paver?” Natural stone pavers, such as granite, tend to be on the higher end of the pricing spectrum due to their durability and aesthetic appeal.
Using a Wet Saw for Precise Cuts
When using a wet saw, ensure that you follow the manufacturer’s instructions for setup and operation. Attach a diamond blade suitable for paver cutting and adjust the saw’s settings to the desired depth. Place the paver on the saw’s cutting table, aligning the marked cut line with the blade. Slowly push the paver through the saw, maintaining a steady and even pressure. Let the saw do the work, and avoid forcing the paver through too quickly, as it can lead to rough cuts or blade damage.
Using an Angle Grinder for Curved Cuts
For curved cuts or notches, an angle grinder with a diamond blade is a versatile tool. Secure the paver firmly, either with clamps or by placing it on a stable surface. Follow the marked cut line and slowly guide the grinder along the desired path, maintaining a steady hand and even pressure. Take your time and make multiple passes if needed to achieve a clean and precise cut.
Step 3: Cutting the Pavers
Now that you’ve selected the appropriate cutting method, it’s time to make the actual cuts. When using a wet saw or angle grinder, follow the marked cut lines carefully and maintain a steady hand. Let the tool do the work, ensuring a smooth and controlled motion. If you’re using a chisel and hammer, make small, controlled strikes along the marked line to create the desired cut. Take your time, and periodically check the progress to ensure the cut is coming along as planned.
Techniques for Straight Cuts
For straight cuts, keep the paver aligned with the cut line and apply steady pressure to the cutting tool. Use guide rails or clamps for added precision and stability. Take breaks as needed to avoid overheating the blade or tool.
Techniques for Curved Cuts
For curved cuts, gradually guide the cutting tool along the marked line, adjusting your hand position as needed. Make small, incremental cuts to achieve the desired curve. Take extra care to ensure smooth and accurate curves, as any abrupt changes may compromise the paver’s integrity.
Step 4: Finishing and Edging the Cut Pavers
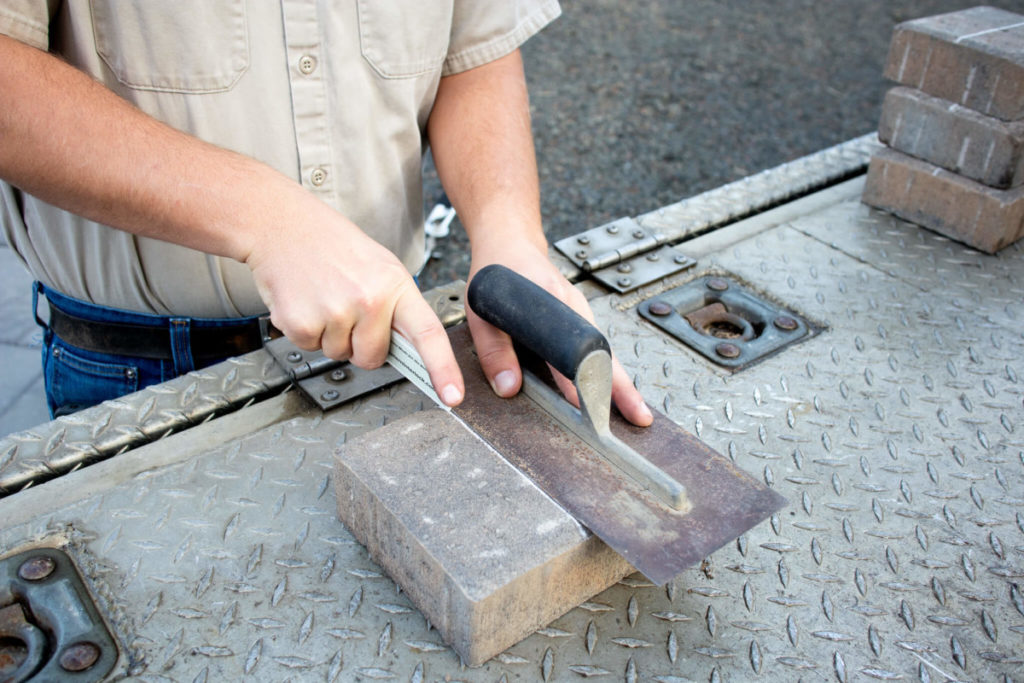
Once the pavers are cut to the desired size and shape, it’s important to smooth the cut edges for a professional finish. Use a rubbing stone or sandpaper to remove any rough edges or burrs. Additionally, consider adding an edging border to the cut pavers to provide a clean and polished appearance. This will also help secure the pavers in place and prevent shifting over time.
Smoothing the Cut Edges
To smooth the cut edges, gently rub a rubbing stone or sandpaper along the cut surface. Work in a consistent motion until the edges are smooth to the touch. This will enhance the overall appearance of the pavers and prevent any potential hazards from sharp edges.
Adding an Edging Border
Adding an edging border to the cut pavers provides a finished look and helps secure them in place. Use appropriate edging materials, such as plastic or metal landscape edging, and install them according to the manufacturer’s instructions. This step will help maintain the integrity of the paved area and prevent shifting or spreading of the pavers.
Tips and Common Mistakes to Avoid
To ensure successful paver cutting, consider the following tips and avoid common mistakes: Always wear appropriate safety gear and follow safety precautions. Start with practice cuts on spare pavers to familiarize yourself with the tools and techniques. Take breaks as needed to prevent overheating of tools or blades. Double-check measurements and markings before making cuts. Use a slow and controlled motion when cutting, allowing the tool to do the work. Keep extra pavers on hand in case of mistakes or replacements.
Maintenance and Care for Cut Pavers
Once the pavers are cut and installed, regular maintenance and care will help prolong their lifespan and appearance. Regularly sweep or rinse the paver surface to remove debris and prevent buildup. If necessary, use a mild detergent and a soft-bristle brush for tougher stains. Avoid using harsh chemicals or abrasive cleaners that could damage the pavers. Additionally, inspect the pavers periodically for any signs of damage or shifting. Address any issues promptly to prevent further damage and ensure the longevity of your paver installation.
Conclusion: Mastering the Art of Cutting Pavers
Cutting pavers may seem intimidating at first, but with the right tools, techniques, and precautions, you can achieve precise and professional-looking cuts. By following the step-by-step guide outlined in this article and considering the tips and recommendations, you’ll be able to tackle any paver cutting project with confidence. Remember to prioritize safety, take your time, and enjoy the process of creating beautiful and custom paver installations.