Step-by-Step Guide to Comparing Paver Installation Options

Step-by-Step Guide to Comparing Paver Installation Options
Plan a Paver Installation That Lasts
A durable paver installation starts with the right choice of material, a well-compacted base, and drainage that moves water away from the home. Whether you are comparing a patio, walkway, or driveway, use this quick checklist:
- Match the paver and base depth to the load. Patios and walkways need less support than driveways.
- Set a drainage slope of about 1/8 to 1/4 inch per foot. This helps prevent puddles and water damage.
- Use compacted crushed aggregate, a 1-inch sand bedding layer, edge restraints, and joint sand.
- Compare DIY costs with professional work before committing. A 200-square-foot DIY patio may cost about $1,050 to $2,030, while professional installation commonly ranges from $2,500 to $8,000.
The pavers are the visible part of the project. The layers below them determine whether the surface stays level, drains well, and handles years of foot traffic or vehicle weight. This guide helps Bay Area homeowners compare those choices clearly before work begins.
Comparing Paver Materials for Patios, Walkways, and Driveways
Choosing the right hardscape material is about balancing aesthetics, load requirements, maintenance, and long-term value. Different outdoor spaces demand distinct structural capabilities. A backyard garden path does not experience the punishing weight cycles of an SUV turning into a driveway.
Here is a side-by-side comparison of the most popular paving surfaces used in residential landscape design:
| Material Type | Typical Cost (DIY Installed / sq ft) | Average Lifespan | Compressive Strength / Load Capacity | Best Application |
|---|---|---|---|---|
| Concrete Interlocking Pavers | $6 – $12 | 25 – 50 years | High (8,000+ psi) | Driveways, Patios, Walkways |
| Natural Stone (Flagstone/Limestone) | $12 – $25+ | 50 – 100+ years | Medium to High (varies by stone) | Patios, Garden Paths, Pool Decks |
| Porcelain Pavers / Slabs | $14 – $30+ | 30 – 50+ years | Very High (dense, scratch-proof) | Contemporary Patios, Sunrooms |
| Clay Brick Pavers | $8 – $18 | 50 – 100+ years | High (6,000 – 9,000 psi) | Historic Walkways, Accents, Patios |
Modern interlocking pavers remain the industry standard for versatile residential paving. Their engineered edges and uniform thickness allow them to distribute vehicular and pedestrian loads evenly across the base beneath them, resisting cracking far better than poured concrete.
Evaluating Material Longevity and Compressive Strength
When evaluating materials for your outdoor living space, engineering specifications matter. Concrete units manufactured under ASTM C936 standards must meet a minimum compressive strength of 8,000 psi (55 MPa) and keep water absorption under 5%. This dense composition ensures that concrete pavers withstand freeze-thaw cycles without spalling or breaking apart under heavy vehicle tires.
Natural stone (such as granite, limestone, or bluestone) brings organic textures and distinct color variation to a patio. However, you must account for natural clefts and variations in thickness during installation. When deciding between natural stone and manufactured options, our guide on natural stone vs porcelain pavers breaks down how porcelain provides near-zero water absorption and stain resistance, whereas natural stone requires careful aggregate bedding and occasional sealing.
Choosing the Right Foundation for Your Paver Installation
No hardscape surface is better than the ground beneath it. The foundation distributes weight into the subsoil, channels moisture away, and keeps your surface from turning into a roller coaster over time.
For standard residential hardscaping, Class II Road Base (a dense mix of crushed 3/4-inch aggregate and rock dust) or open-graded stone provides optimal structural support. Never use recycled concrete containing unwashed debris for bedding layers, as its unmanaged salts can accelerate surface efflorescence.
Base depth requirements change based on intended use:
- Pedestrian Walkways & Patios: 4 to 6 inches of compacted aggregate base.
- Standard Vehicular Driveways: 8 to 12 inches of compacted aggregate base.
- Heavy RV / Commercial Loading: 12 inches or more of base over heavy-duty stabilization fabric.
For driveways, paver units must be at least 3-1/8 inches (80 mm) thick to absorb dynamic vehicular braking and turning forces. For in-depth structural advice, read our insights on driveway paver installation to avoid common load-bearing failures.
Step-by-Step Hardscape Planning and Excavation Methods

A successful hardscape project begins well before the first shovel touches the ground. Careful layout, utility clearances, and grading protect you from expensive mistakes down the road.
Before breaking ground, always call 811 (or your regional utility locator) to mark buried electric, gas, cable, and water lines. Skipping this step risks safety hazards, project delays, and utility repair fines.
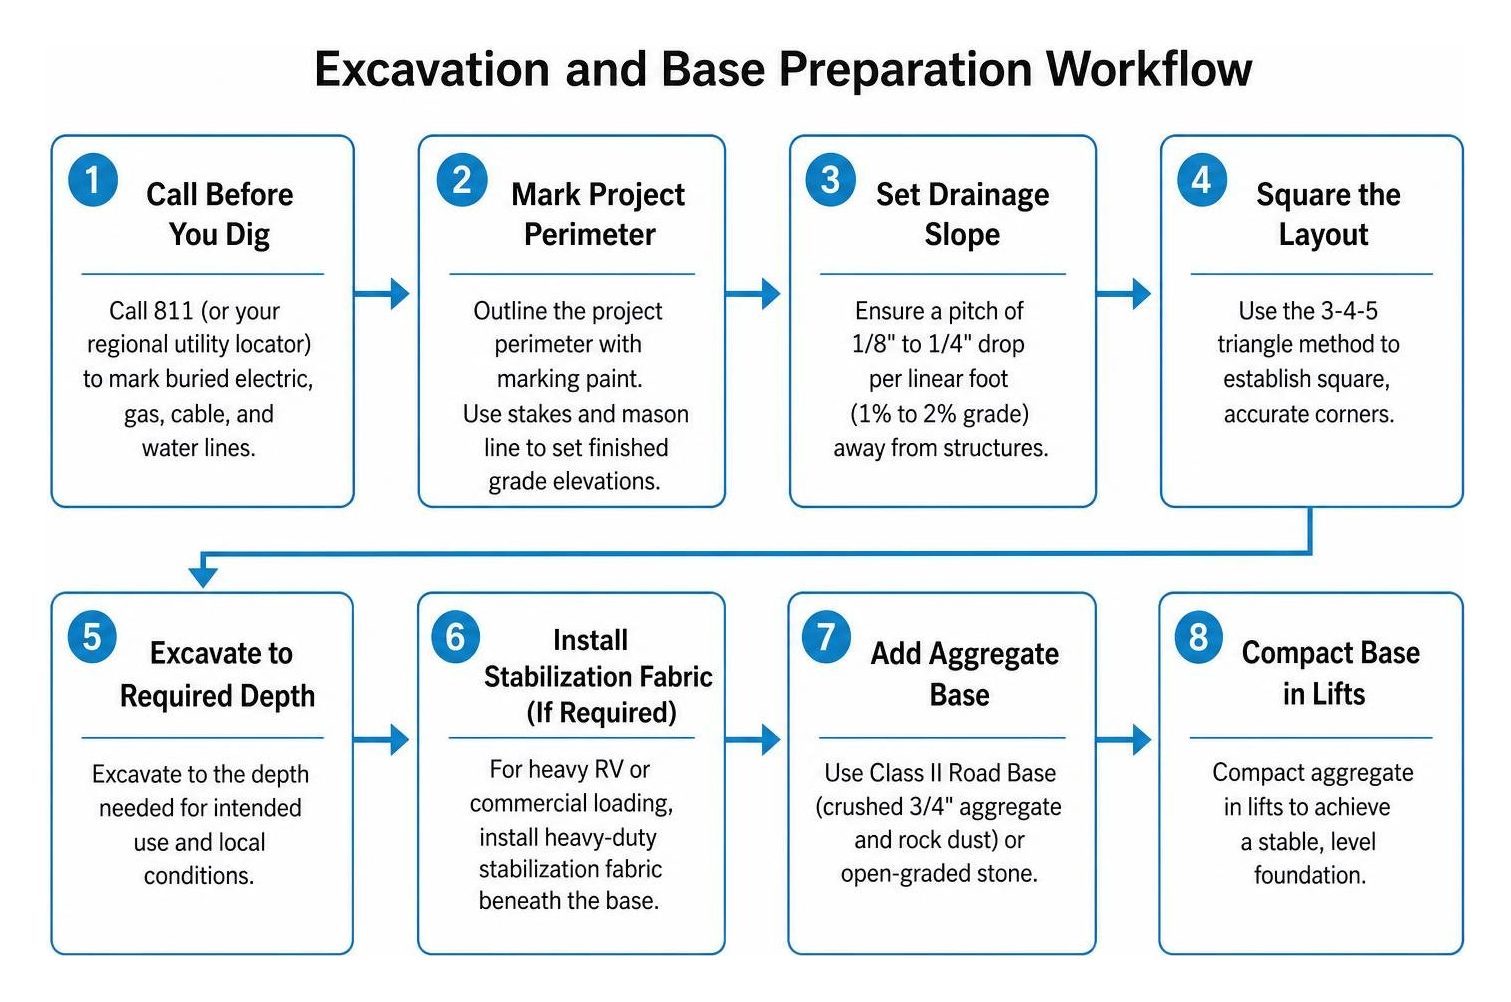
Once underground utilities are cleared, outline the project perimeter with marking paint. Use wooden stakes and mason line to establish finished grade elevations and drainage slopes. Proper water management requires a pitch of 1/8 inch to 1/4 inch drop per linear foot (a 1% to 2% grade) away from home foundations, retaining walls, and neighboring structures.
To establish crisp, square layouts for patios and driveways, apply the 3-4-5 triangle method:
- Measure 3 feet along one reference line from a corner stake.
- Measure 4 feet along the perpendicular line.
- Adjust the angle until the diagonal distance between the two marks measures exactly 5 feet.
This simple geometric rule gives you a true 90-degree corner to align your paver patterns against. For a full walkthrough of layout math and tools, check out our guide on paver installation preparation.
Subgrade Compaction and Geotextile Fabric Selection
Total excavation depth must account for the full hardscape system: subgrade preparation, aggregate base, a 1-inch sand bedding layer, and the paver unit thickness.
- Pedestrian areas: 7 to 9 inches total excavation depth.
- Vehicular driveways: 11 to 15 inches total excavation depth.
Excavate an additional 6 inches beyond the finished perimeter on all open sides. This extended footprint provides a solid shelf to pin edge restraints firmly into the aggregate base rather than loose topsoil.
Once the soil is excavated, run a commercial vibrating plate compactor over the bare subgrade dirt. If you are building over soft clay soils or areas with high moisture tables, line the trench with a woven geotextile separation fabric. This prevents subgrade soil from churning up into your crushed stone base over time, as highlighted in technical recommendations like the General Installation Guide.
Spread your Class II aggregate in 2- to 4-inch lifts, misting each layer lightly with water before running the plate compactor in overlapping, orthogonal passes. Moisture lubricates the aggregate particles, allowing them to interlock tightly and reach peak compaction density.
Bedding Sand Screeding and Depth Control
Once the aggregate base is compacted smooth (with a surface tolerance within ±3/8 inch over 10 feet), place your bedding sand layer.
Use clean, sharp, angular concrete sand conforming to ASTM C33 standards. Do not use fine play sand, limestone dust, or masonry sand for this layer, as rounded or fine grains wash away when exposed to subsurface moisture.
To screed the sand evenly:
- Lay two parallel 1-inch outer-diameter metal conduit pipes across the compacted base.
- Spread coarse concrete sand between the pipes.
- Pull a straight aluminum screed board or 2×4 across the pipes to strike off an even 1-inch sand bed.
- Remove the pipes and fill the remaining voids lightly with sand, smoothing them with a hand trowel.
Do not compact or step on this bedding sand before placing your pavers. Leaving the sand loose allows the pavers to seat into the bed during final compaction, creating the structural interlock that stabilizes the system. For more pitfalls to watch out for during this stage, read through our review of 5 paver installation mistakes to avoid.
Essential Techniques for Laying, Cutting, and Edge Restraints
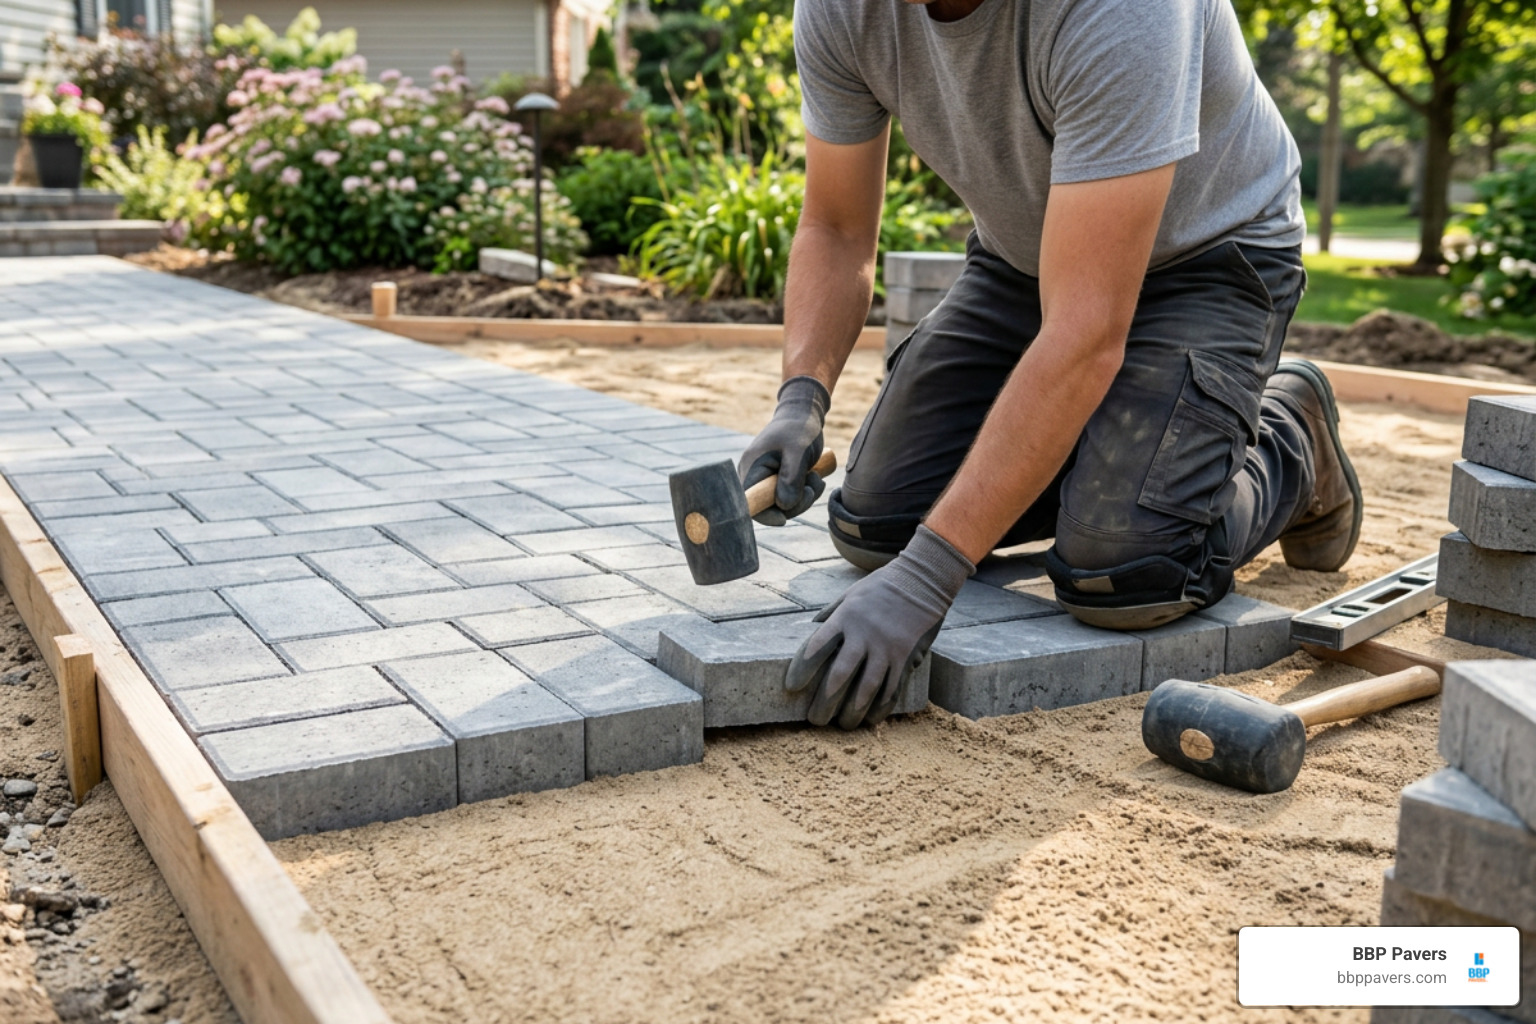
Always start laying pavers from a primary straight reference line, such as a foundation wall, an installed edge restraint, or a snapped chalk string line. Place each stone straight down onto the bedding sand without sliding it across the surface.
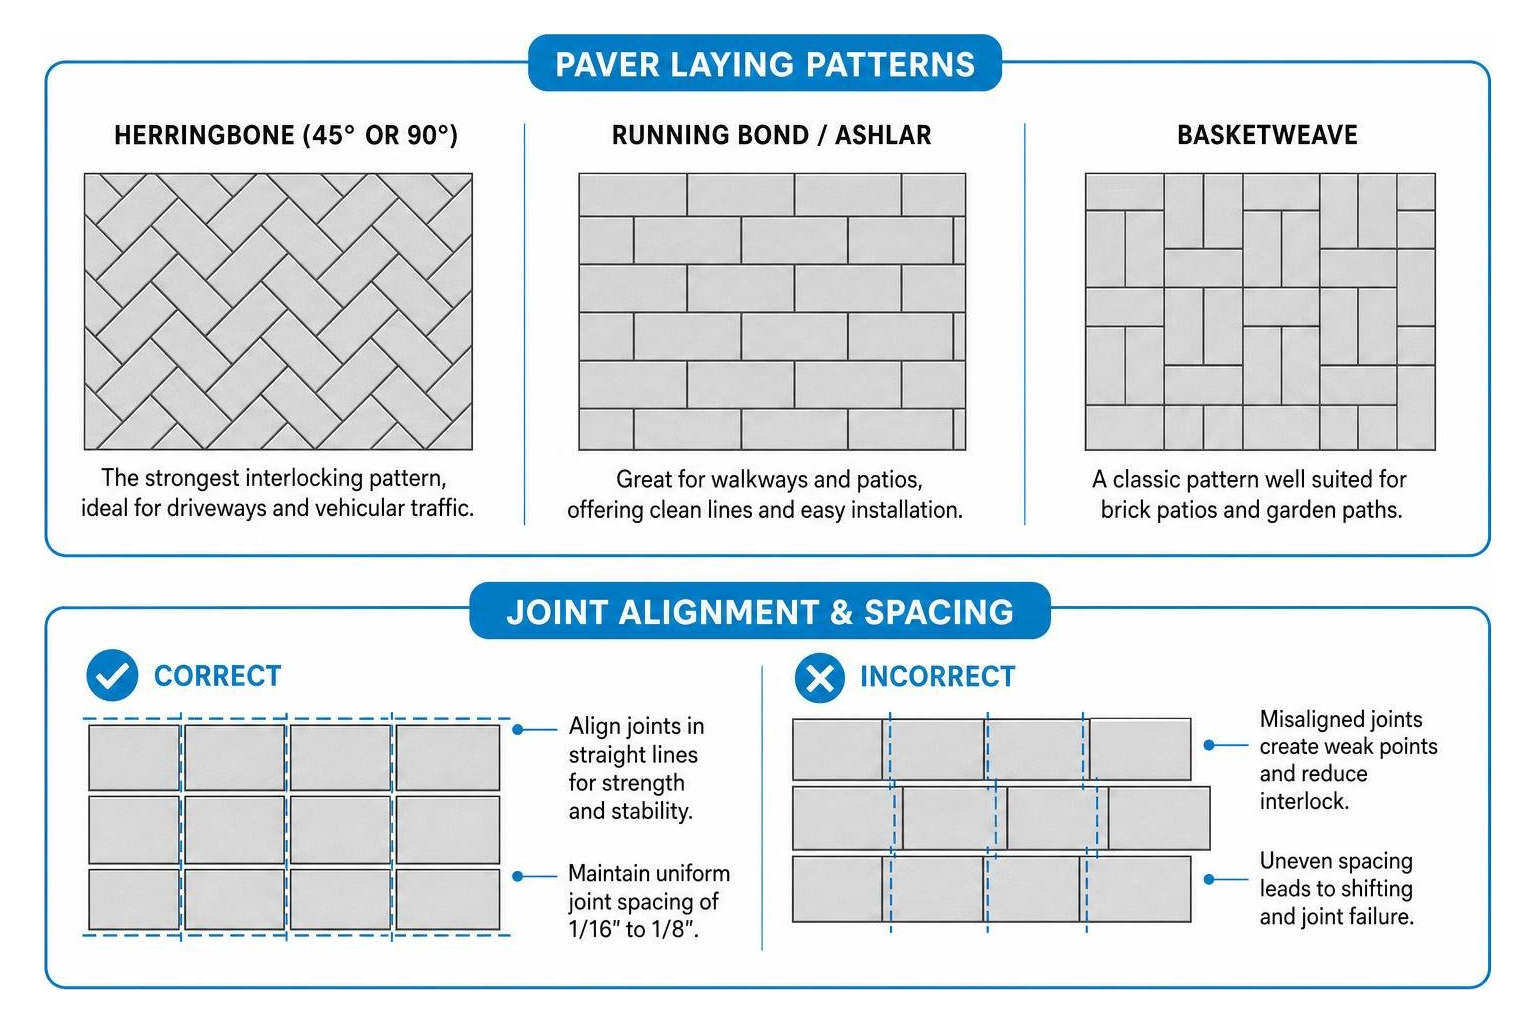
Maintain a tight, uniform joint spacing of 1/16 to 1/8 inch between stones. Most modern concrete pavers feature built-in spacer nibs along their edges to maintain these joint gaps automatically. When laying large surfaces, pull units from multiple pallets or cubes at once to blend subtle color variations across the field.
Select a laying pattern that complements the architectural style and matches the structural demands of the space:
- Herringbone (45° or 90°): The strongest interlocking pattern, making it the premier choice for driveways and vehicular traffic.
- Running Bond / Ashlar: Great for walkways and backyard patios, offering clean lines and straightforward installation.
- Basketweave: A classic pattern well suited for brick patios and historic garden paths.
When field pavers reach curves or borders, mark your cuts with a pencil and straightedge. You can cut pavers using a manual block splitter, a circular saw equipped with a diamond masonry blade, or a wet concrete saw. Always wear protective eye goggles, heavy gloves, and an OSHA-rated N95 or P100 respirator to avoid inhaling airborne crystalline silica dust. If you need step-by-step guidance on making clean, chip-free cuts, review our tutorial on how to cut pavers.
Edge Restraint Anchoring and Lateral Stability
Without heavy-duty edge restraints, the perimeter of a paver installation will spread outward under traffic, causing joints to open and edge stones to tip.
Install heavy-gauge commercial PVC, aluminum, or poured concrete edge restraints directly on top of the compacted aggregate base:
- Pedestrian Walkways and Patios: Drive 10-inch steel spikes every 2 feet along the edging track.
- Vehicular Driveways: Drive a spike every 1 foot to counteract heavy lateral tire forces.
Secure your edge restraints before final joint compaction. For more information on perimeter styles and curbing options, explore our guide to driveway edging.
Polymeric Sand Jointing and Compaction Lock-Up
Joint sand is the final element that binds individual paving stones into a unified, flexible pavement slab. Standard unbonded sand tends to wash away during heavy rains, attract burrowing ants, and allow weeds to take root.
Modern installations use advanced polymeric sand—a calibrated mixture of graded sand and dry polymer binders that conforms to ASTM C144 standards. When swept into joints and activated with water, the polymers cure into a firm, flexible joint matrix that resists erosion while absorbing minor ground movement.
Follow this sequence for joint compaction:
- Sweep the dry paver surface completely clean of debris.
- Rent a vibrating plate compactor equipped with a protective urethane mat (to avoid scuffing the paver faces) and make two passes across the field to seat the pavers into the bedding sand.
- Spread dry polymeric sand across the surface and sweep it into the joints using a stiff-bristle broom until completely filled.
- Run the plate compactor over the surface again to vibrate the sand deep into the joint voids. Refill any settled areas.
- Use a leaf blower on low throttle to remove all residual sand dust from the surface of the stones.
- Set a garden hose nozzle to a fine mist and wet the paved area in 200-square-foot sections for roughly 30 to 45 seconds each. Allow the water to soak through the joints without washing the sand away.
- Allow 24 to 48 hours of dry weather for the polymeric sand to fully cure.
For additional DIY tips on sand activation, consult the Complete DIY Installation Guide.
Professional vs. DIY Paver Installation: Cost and Feasibility Breakdown
Deciding between taking on a hardscape project yourself or hiring a licensed professional comes down to budget, project size, physical ability, and how much time you have.
Hardscape excavation is labor-intensive: a 200-square-foot patio requires digging out, hauling, and compacting roughly 4 to 6 tons of earth and aggregate base material.
Homeowners who tackle simple, rectangular patios can save between $2,000 and $8,000 in labor fees. However, for large driveways, pool decks, sloped yards, or intricate multi-level designs with retaining walls, hiring an experienced team ensures long-term drainage compliance and structural stability. To explore budget models across various layouts, see our detailed guide on paver patio installation cost.
For help picking materials that match your budget and architecture, check out our advice on how to choose the best pavers for your patio.
Crucial Steps in the Paver Installation Process
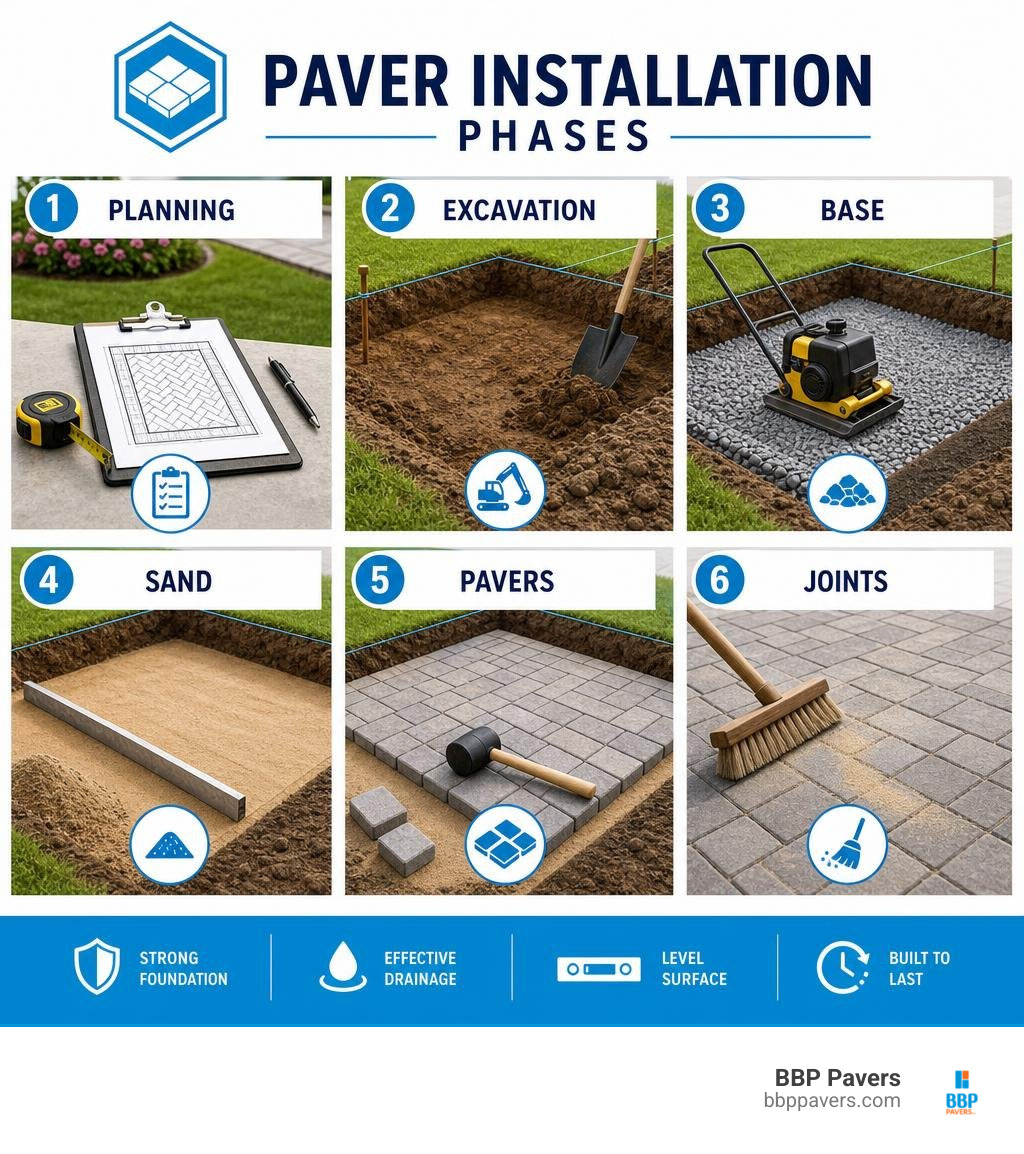
Whether you do the work yourself or bring in a crew, every durable hardscape build follows these fundamental phases:
- Detailed Site Evaluation & Underground Utility Clearance: Marking boundaries and calling 811.
- Excavation & Subgrade Grading: Setting a 1% to 2% slope for positive water runoff.
- Subgrade Stabilization: Compacting the soil and placing geotextile fabric where needed.
- Aggregate Base Placement & Multi-Lift Compaction: Installing 4 to 12 inches of Class II Road Base.
- Precision Screeding: Pulling a 1-inch uncompacted ASTM C33 bedding sand layer.
- Laying Field Pavers & Diamond Cutting: Maintaining clean joint alignment and trimming perimeter pieces.
- Perimeter Restraint Anchoring: Securing edge restraints with 10-inch steel spikes.
- Initial Compaction, Polymeric Jointing, and Final Lock-Up: Vibrating the sand to consolidate the structure.
For a closer look at field execution, read our step-by-step walkthrough on how to lay pavers.
Sealing and Long-Term Surface Maintenance
Concrete and natural stone pavers perform reliably for decades with minimal routine maintenance. However, applying a breathable, penetrating hardscape sealer protects your investment against oil spills, barbecue grease, UV fading, and organic stains from leaves or berries.
A few key maintenance practices:
- Efflorescence Care: Efflorescence is a natural white salt deposit that can rise to the surface of new concrete pavers. Let new pavers breathe for 60 to 90 days (or through one wet season) to allow these salts to weather away before applying a permanent topical sealer.
- Power Washing Guidelines: Avoid high-pressure, narrow-tip power washing directly over paver joints, as this blows out polymeric sand. Use a wide fan tip at low pressure alongside a dedicated hardscape cleaner.
- Resealing Schedule: Apply a quality penetrating sealer every 3 to 5 years to keep colors vibrant and preserve joint stability.
For product recommendations and application tips, read our complete guide on how to seal pavers.
Frequently Asked Questions About Paver Systems
Can you lay pavers directly over existing dirt or concrete?
You should never lay pavers directly over bare dirt or grass. Soil naturally expands, contracts, and erodes when wet, which will cause pavers to sink, tilt, and separate within one to two seasons. A compacted aggregate base is essential for a stable surface.
You can install pavers over an existing concrete slab only if the concrete is structurally sound, free of major settling cracks, and sloped properly away from structures. In these overlay applications, a thin 1/2- to 1-inch sand or thin-set bedding layer is used alongside perimeter drainage weep holes. For more details on ground preparation, see our guide on how to lay pavers on grass.
How thick should the base layer be for driveways vs. patios?
Base depth depends on the anticipated load and soil type:
- Walkways & Patios (Pedestrian Load): 4 to 6 inches of compacted Class II aggregate base.
- Driveways & Parking Pads (Vehicular Load): 8 to 12 inches of compacted Class II aggregate base (up to 12–15 inches in deep clay soils).
Using a 3-1/8-inch (80 mm) paver unit alongside an interlocking pattern like a 45-degree herringbone ensures your driveway holds up to heavy vehicular traffic. To compare layout options, read our guide on driveway paver patterns.
Why is polymeric sand better than regular sand for paver joints?
Standard silica or masonry sand washes out during storms, blows away in high winds, and leaves open gaps where weed seeds take root and ants burrow.
Polymeric sand contains dry organic polymers that activate with water. Once cured, it forms a firm yet flexible joint barrier. This prevents erosion, keeps out weeds and insects, and improves interlock—yielding joints that are nearly 20% stronger than unbonded sand.
Plan Your Hardscape with Confidence
A well-designed, professionally built paver feature brings lasting curb appeal, functional outdoor living, and strong return on investment to your home. By choosing quality pavers, building a solid aggregate foundation, maintaining a steady drainage slope, and locking the joints with polymeric sand, you can count on a surface that holds its beauty for decades.
At BBP Pavers, we bring over 20 years of local Bay Area hardscape expertise to every project. Our crews handle the entire installation process—from excavation and soil stabilization to custom stone cutting and structural craftsmanship—backed by our 100% satisfaction guarantee.
If you are ready to explore your outdoor living options, check out our comprehensive guide on how to install pavers or reach out to our team today to schedule your free on-site design consultation and estimate!