Master Landscape Edging with Pavers for a Flawless Yard

Why Landscape Edging with Pavers Is Essential for Hardscape Stability
For durable landscape edging with pavers, extend the compacted aggregate base 6 to 12 inches beyond the finished border, lay and compact the pavers first, then scrape loose bedding sand away from the outside edge. Set a rigid edge restraint directly on the compacted base, press its vertical face tight against the pavers, keep its top 1/8 to 1/4 inch below the paver surface, and anchor it with 10-inch spikes driven into the dense base, ideally at a 60-degree angle. Backfill behind the restraint in compacted lifts so the border stays hidden, supported, and resistant to lateral movement.
Interlocking concrete pavements are dynamic structural systems. Unlike poured-in-place concrete slabs, which rely on internal tensile strength and steel rebar, segmented pavers distribute weight across thousands of individual friction points. When a vehicle drives onto a driveway or family members walk across a patio, the downward vertical force transfers outward as lateral thrust. Without a solid perimeter barrier, this lateral thrust causes the pavers along the perimeter to migrate outward, a failure mode known as lateral drift.
When the perimeter shifts even a fraction of an inch, the interlocking friction between units collapses. The joints widen, sand washes out, and the entire paved surface begins to loosen, sink, and rotate. Interlocking Concrete Pavement Institute (ICPI) technical standards require a continuous vertical restraining face along all unbound paver perimeters. Learning how to lay pavers correctly means treating the edge restraint not as an optional trim piece, but as the foundational bookend that preserves the structural load distribution of the entire hardscape.
Fixing edge failure down the road is costly. Once pavers shift, the surrounding soil must be excavated, the base rebuilt, and the stones re-laid. Investing in high-grade perimeter containment from day one protects your investment and ensures your outdoor living space remains safe and pristine.
Structural Mechanics and Sand Containment
Underneath every successful paver installation lies a 1-inch bedding layer of coarse, washed concrete sand conforming to ASTM C33 specifications. This bedding layer does not act as a glue; instead, when pavers are compacted into it, the angular sand particles migrate upward 1/8 to 1/4 inch into the bottom joints, creating a mechanical lock.
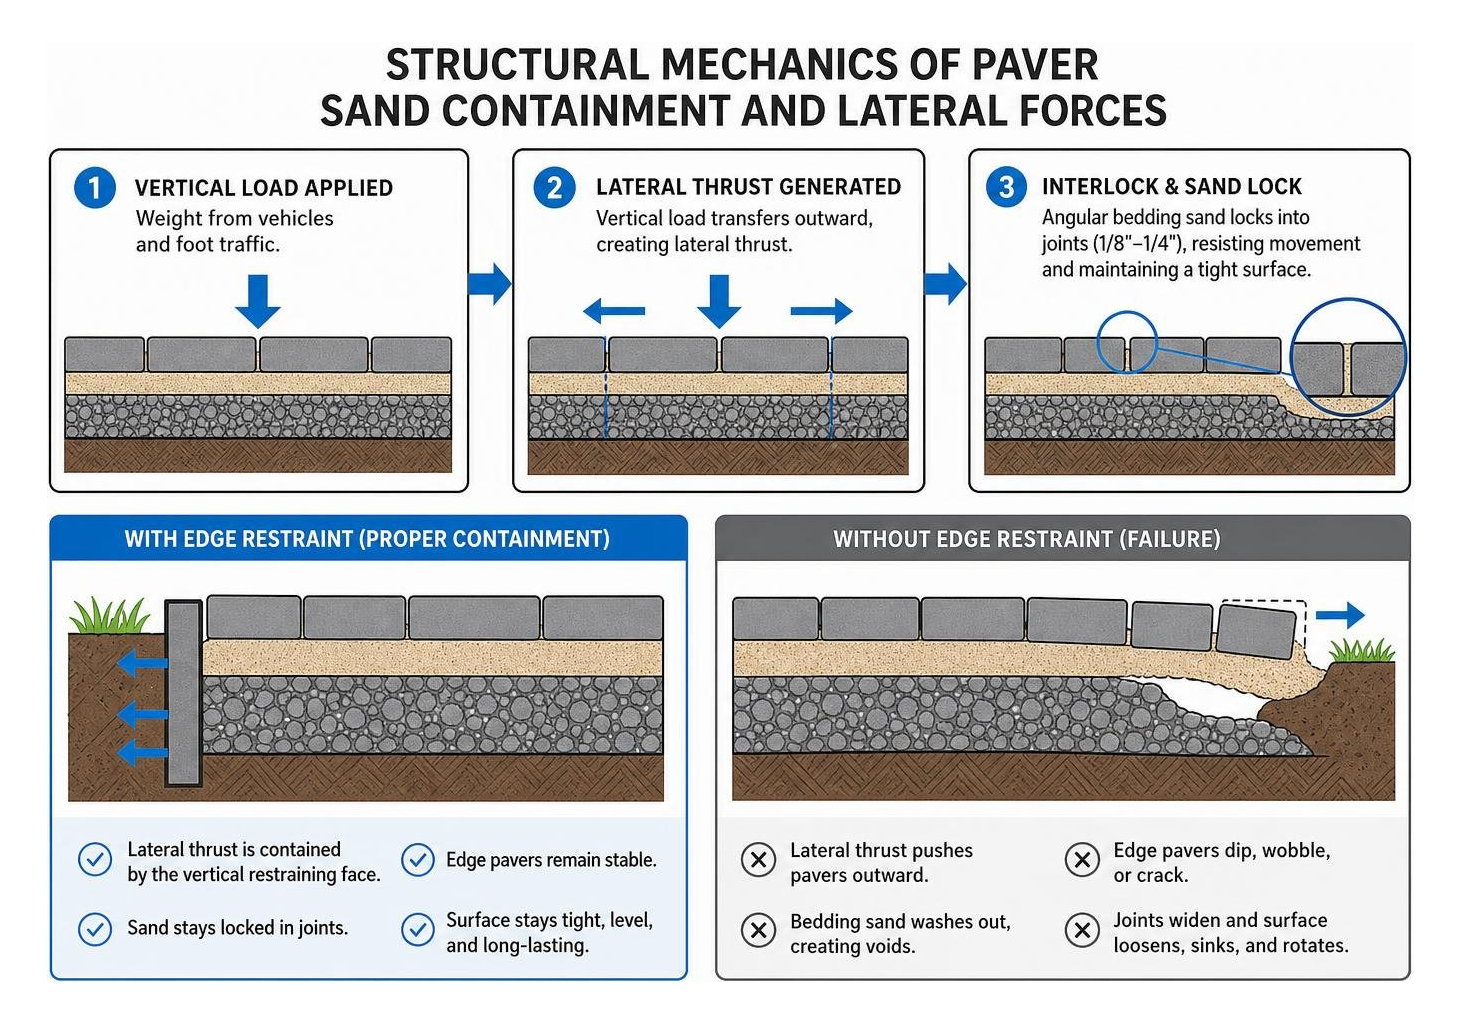
If the edge restraint fails or sits improperly, heavy rainfall and foot traffic will cause joint sand washout along the perimeter. As the bedding sand bleeds out into the adjacent soil, voids form underneath the edge pavers, causing them to dip, wobble, and crack. Reviewing proven methods for laying pavers as garden edging shows that a robust vertical restraining face must extend from the bottom of the aggregate base up past the bedding layer to contact the lower third of the paver body. This barrier prevents sub-base erosion while stopping aggressive turf creep and weed rhizomes from penetrating the joints between your border stones.
Resisting Frost Heave and Freeze-Thaw Cycles
In regions subject to cold seasons or winter temperature drops, moisture trapped in the sub-grade soil expands by roughly 9% when freezing. This expansion creates upward and outward pressures known as frost heave. Poorly anchored restraints pop out of the ground, leaving the edge pavers vulnerable to displacement when the ground thaws into a saturated, spongy state.
To counteract this thermal movement, edge restraint systems rely on deep mechanical anchoring and dowel action. Driving heavy-gauge steel spikes through the restraint flanges directly into dense, compacted aggregate base material locks the edging into the earth below the zone of surface movement. For homeowners planning projects like driveway edging in Concord, CA, proper sub-base soil compaction and smart drainage slopes (a minimum of 1.5% to 2% away from structures) prevent water accumulation, neutralise heave forces, and keep the paver perimeter straight year after year.
Selecting the Right Edge Restraints and Border Styles
The foundation of edge restraint performance is aggregate base extension. You cannot nail an edge restraint into soft topsoil or uncompacted dirt. The compacted crushed stone base must extend 6 to 12 inches beyond the final paver perimeter. This provides a dense structural foundation capable of anchoring restraint spikes without splitting or loosening under traffic loads.
| Restraint Material | Primary Strengths | Limitations | Best Applications | Expected Lifespan |
|---|---|---|---|---|
| Aluminum (e.g., Extruded Profiles) | High rigidity, lightweight, tight curve forming, corrosion-proof | Higher initial material cost | Patios, walkways, modern curved beds | 25–30+ Years |
| Heavy-Duty HDPE Plastic | Cost-effective, flexible, hidden low-profile lip | Can lift if improperly spiked; degrades under extreme heat | Residential walkways, garden borders | 10–15 Years |
| Structural Steel | Extreme shear resistance, handles heavy vehicular weight | Heavy to handle, requires anti-corrosion coating | Commercial plazas, residential driveways | 25+ Years |
| Poured Concrete Curb / Toe | Affordable materials, custom contouring, zero hardware | Labor intensive, prone to cracking in freeze-thaw zones | Driveways, soldier courses, formal borders | 15–20 Years |
When exploring the top stone edging options, matching the restraint material to both the pedestrian or vehicular load requirements and your preferred design aesthetic ensures a clean, long-lasting transition.
Material Selection for Landscape Edging with Pavers
Selecting restraint materials involves balancing initial budget against long-term lifecycle return on investment. Aluminum edge restraints have become the gold standard among professional contractors. Extruded aluminum offers crisp, clean sightlines, will not rot or crack, and delivers superior rigidity on straight lines while easily bending into sweeping radiuses when the spine tabs are cut.
Heavy-duty commercial plastic (high-density polyethylene or PVC with UV inhibitors) provides a dependable, budget-conscious alternative for pedestrian garden walkways and informal patios. However, thin, flexible edging sold in rolled coils at big-box stores should never be used as a structural paver restraint; it lacks the vertical rigidity required to retain lateral forces. When working through how to select pavers for your project, factor in the perimeter restraint system right from the design phase to avoid unexpected material mismatches later on.
Restraints vs. Soldier Courses, Cobblestones, and Concrete Curbs
Paver borders can be styled as either hidden structural restraints or bold visual features:
- Soldier Courses: Pavers laid side-by-side with their long dimensions perpendicular to the path edge. This classic border pattern creates a visual frame around patios and driveways.
- Sailor Courses: Pavers laid end-to-end with their long dimensions parallel to the border line, offering a thinner perimeter band.
- Natural Stone Borders: Granite sets, cobblestones, and heavy stone blocks set on a compacted base provide rich texture and rustic charm.
- Concrete Toe Curbing: A troweled concrete wedge (often using high-strength 4000 psi concrete) poured against the outer edge of the pavers at a 45-degree angle below the turf line.
For DIY enthusiasts seeking a seamless look, following a guide on concrete edging for pavers provides practical tips on mixing, form building, and curing concrete toe curbs. While concrete toe curbs eliminate the need for mechanical spikes, hidden aluminum and heavy-duty plastic profiles allow sod and topsoil to sit directly against the paver perimeter, concealing all structural components beneath your lawn.
Complete Installation Guide for Paver Borders
Installing a clean, durable border requires precision. To achieve a seamless transition between your hardscape and softscape, follow this field-tested installation workflow:
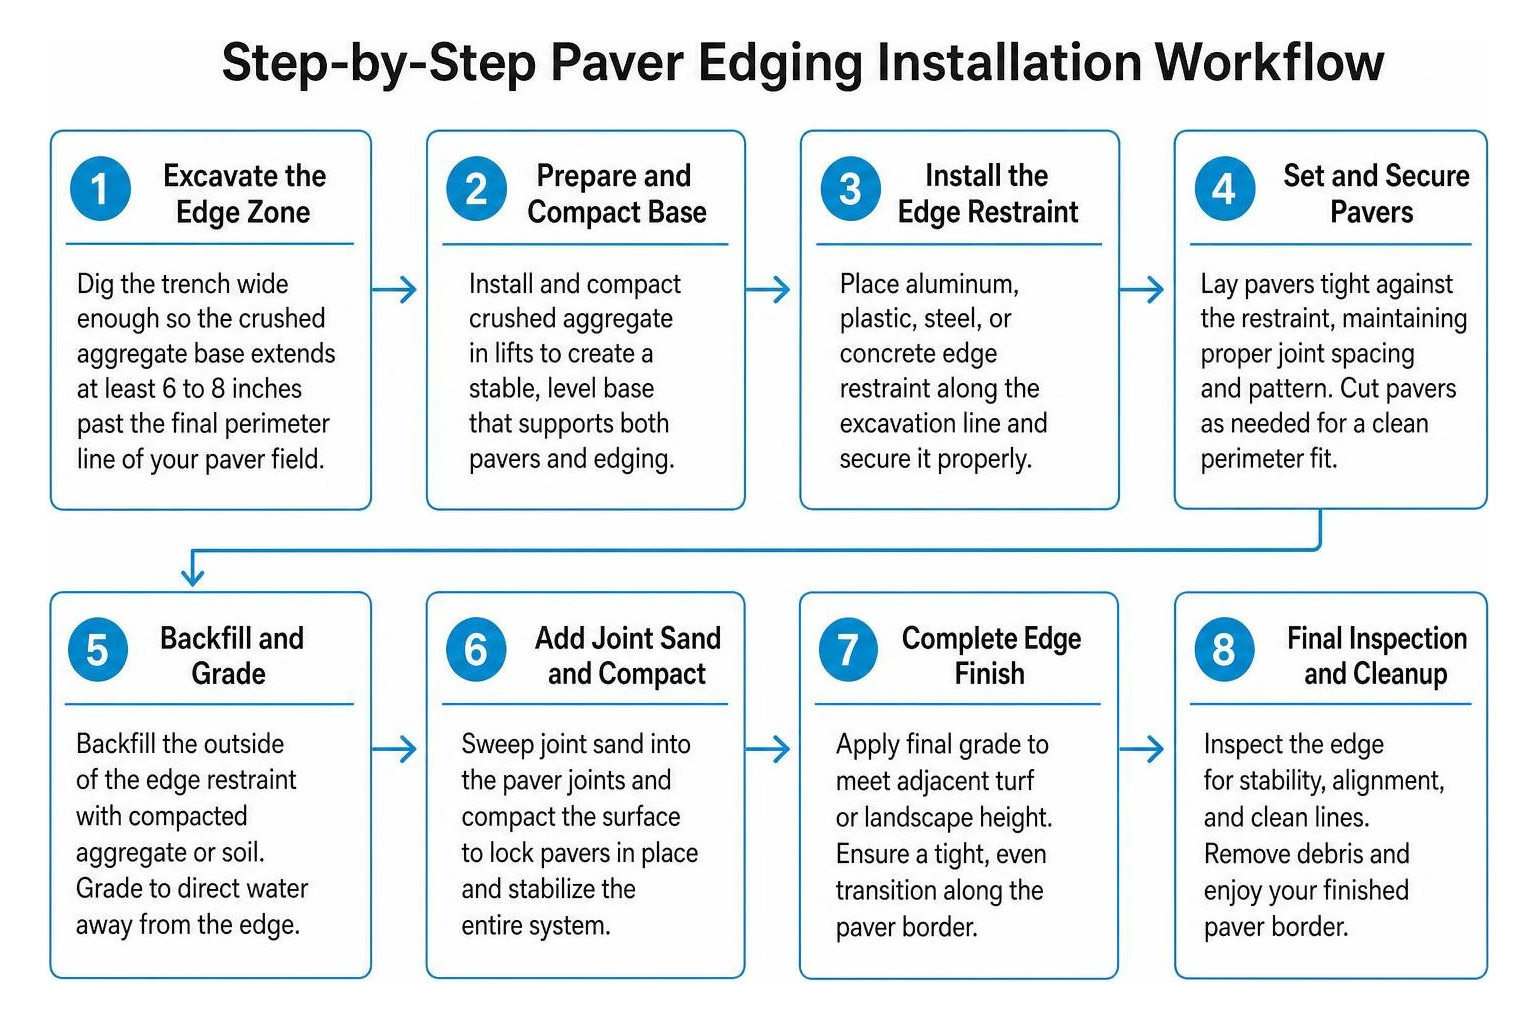
Understanding the broader scope of how to install pavers ensures your edge installation integrates cleanly with your base excavation, aggregate compaction, and sand screeding steps.
Step-by-Step Installation of Landscape Edging with Pavers
- Excavate the Edge Zone: Dig your installation trench wide enough so the crushed aggregate base extends at least 6 to 8 inches past the final perimeter line of your paver field.
- Compact the Extended Base: Run a plate compactor over the base extension until you reach 98% Standard Proctor density. A soft base will cause restraint spikes to loosen.
- Screed Bedding Sand and Lay Pavers: Screed your ASTM C33 sand to a uniform 1-inch thickness and set your field pavers. If incorporating a soldier course border, place those perimeter stones now.
- Scrape Back Excess Sand: Using a trowel or flat spade, carefully scrape away the bedding sand sitting outside the paver boundary down to the aggregate base. Never place the base flange of an edge restraint on top of loose bedding sand.
- Place and Seat the Restraint: Set the restraint flange flat against the compacted aggregate base, pressing the vertical face firmly against the perimeter pavers. Verify that the top edge of the restraint sits 1/8 to 1/4 inch below the top surface of the pavers so plate compactors clear the trim without catching it.
- Fasten with Heavy-Duty Spikes: Secure the restraint using standard 10-inch by 3/8-inch non-galvanized landscaping spikes driven into the aggregate base at designated intervals.
- Perform Initial Compaction and Sanding: Run a plate compactor equipped with a protective urethane pad over the paver field to seat the pavers into the bedding sand. Sweep polymeric sand into the joints, mist with water according to manufacturer directions, and allow it to cure.
- Backfill and Restore Turf: Backfill behind the restraint flange with clean topsoil or aggregate in 2-inch compacted lifts. Lay sod or plant groundcover directly over the restraint flange to completely hide the hardware.
For inspiration on layout patterns and styling options, browse these creative paver walkway ideas to see how border bands transform standard pathways.
Proper Staking Angles and Anchoring Techniques
How you drive spikes into the ground directly dictates pull-out resistance and long-term stability. Using smooth, 10-inch non-galvanized flat-head steel spikes is recommended because the metal naturally oxidizes (rusts) slightly once embedded in the aggregate base. This light surface rust creates friction and bonds with the crushed aggregate particles, significantly increasing mechanical pull-out resistance over galvanized nails.
- Straight Runs: Drive spikes every 12 to 16 inches along the restraint rail.
- Curves and Radii: Increase spike density to every 8 to 10 inches along the bend.
- Corners and High-Stress Points: Place spikes every 6 to 8 inches to absorb turning loads from lawnmowers or vehicles.
- The 60-Degree Driving Angle: While driving spikes vertically provides basic retention, angling the spikes at 60 degrees into the aggregate base underneath the paver edge creates a mechanical wedge. This angle counteracts lateral outward thrust and resists upward frost jacking forces.
Handling Curves, Radii, and Custom Shapes
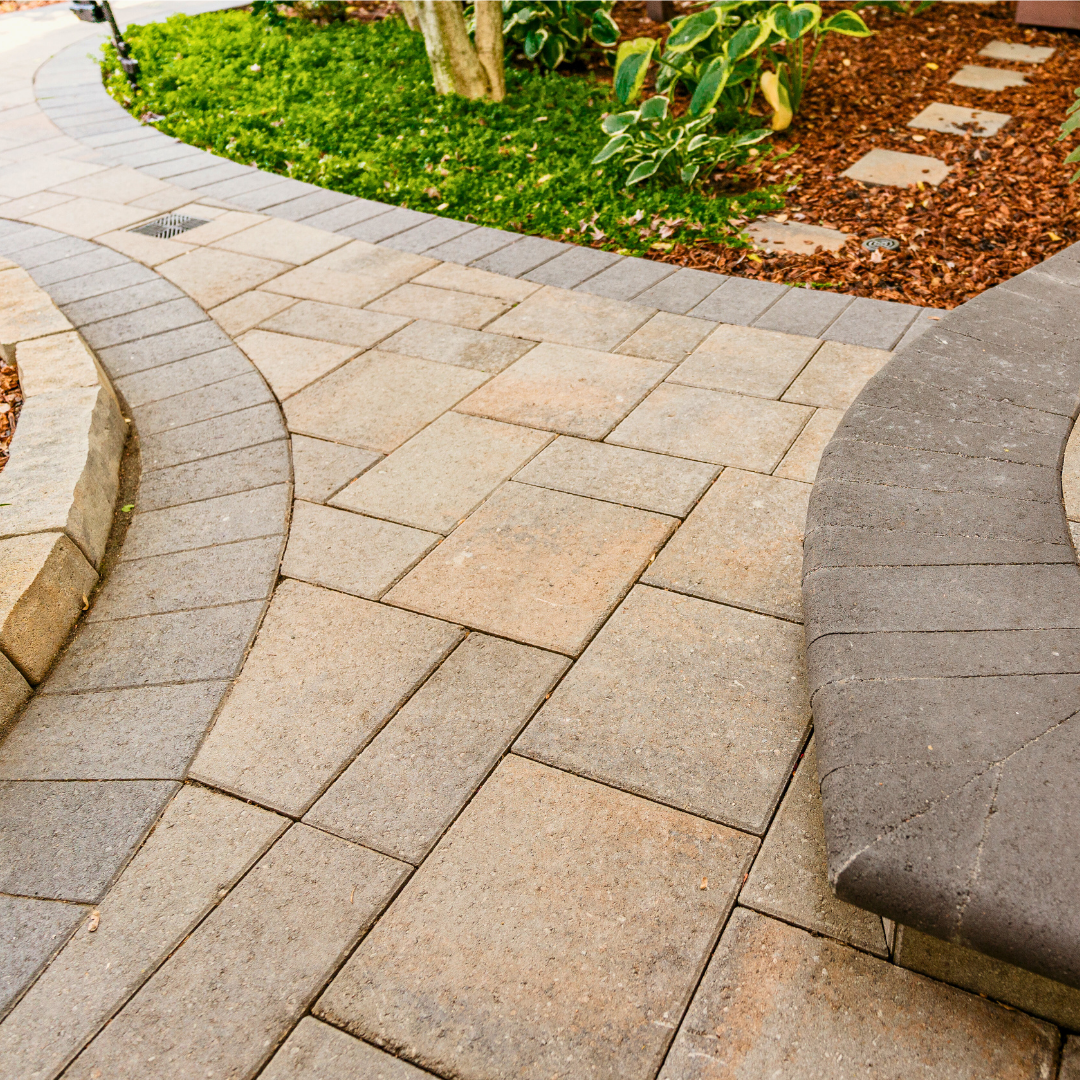
Curved borders add organic flow and elegance to backyard landscapes. When wrapping restraints around serpentine curves:
- Snip the Backbone: Most professional-grade aluminum and plastic restraints feature a continuous structural spine. Use hand shears or tin snips to cut through the connecting spine tabs on the outer flange. This allows the rail to bend smoothly without buckling or pinching.
- Maintain Radius Consistency: Stake the apex of the curve first, then gently bend the restraint along your marked perimeter paint line, driving intermediate spikes as you bend.
- Forming Sharp 90-Degree Corners: For crisp, modern corners, make a 45-degree miter cut through the vertical face of overlapping restraint sections. Overlap the bottom flanges and drive a spike through both sections at the corner point to create an immovable connection.
Pairing smooth, sweeping curves with the best plants to border your paver walkway creates a lush, balanced transition between hardscape masonry and soft garden foliage.
Common Paver Edging Mistakes to Avoid
- Installing Restraints Before Setting Field Pavers: Never install your edge restraints first and attempt to lay pavers toward them. Manufacturing variances in paver dimensions will cause cumulative gap errors, forcing you to make countless awkward cuts at the finish line. Always set field and border pavers first, then butt the restraint tightly against them.
- Resting the Restraint on Bedding Sand: Placing an edge restraint flange on top of loose bedding sand rather than directly on the compacted aggregate base allows sand to wash out beneath the flange, destabilizing both the edging and the spikes.
- Insufficient Aggregate Base Extension: Terminating the crushed stone base flush with the paver edge leaves no solid ground for your spikes. Driving spikes into loose topsoil provides zero holding power.
- Setting the Restraint Too High: Setting the vertical face flush with or higher than the paver surface exposes the plastic or aluminum to mower blades, snow blowers, and plate compactor shoes during final compaction. Always maintain a 1/8 to 1/4 inch drop below the paver surface.
- Backfilling with Loose Organic Material: Filling the trench behind the restraint with uncompacted mulch or loose compost creates air pockets that settle after the first rain, allowing the restraint to tilt backward under lateral loads. Always use compacted soil or crushed aggregate.
Frequently Asked Questions About Paver Edging
Can I install edge restraints before laying the field pavers?
No, you should avoid installing edge restraints before laying your pavers. Concrete and natural stone pavers have minor dimensional variations (often +/- 1/16 to 1/8 inch per unit). If you build a fixed frame first, those microscopic variances will compound across wide spans, causing joint lines to wander and requiring extensive custom stone cutting to close the final row. Lay your field and border stones first over the screeded sand bed, snap a chalk line along the outer edge to mark any trimming, make your clean cuts, and clamp the edge restraint directly against the finished perimeter.
How deep should spikes be driven to secure paver edging?
Landscaping spikes should be a minimum of 10 inches long with a 3/8-inch diameter and driven fully flush into the compacted aggregate base. In areas with deep winter frost lines, driving the spikes through the base into the dense sub-grade below provides optimal lateral resistance. Driving spikes flush with the restraint pocket locks the rail firmly against the aggregate without warping the flange.
What is the difference between soft landscape edging and structural paver edging?
Landscape edging (such as thin rolled plastic coils, decorative scalloped stones, or thin lawn border strips) is designed purely to separate turfgrass from mulch and garden beds. It lacks structural strength. In contrast, structural paver edging is an engineered containment system designed to resist dynamic lateral loads up to thousands of pounds. Per ICPI specifications, structural restraints feature a rigid, vertical face of at least 1 inch that prevents lateral migration of both the paver stones and the underlying ASTM C33 bedding sand layer.
Conclusion
A well-designed paver installation is only as durable as the border holding it together. Proper base extension, structural material selection, precise 60-degree anchoring, and careful joint compaction ensure your hardscape stands strong against weather, foot traffic, and vehicle loads.
At BBP Pavers, our team brings over 20 years of Bay Area hardscape expertise to every project, building custom paver driveways, patios, walkways, retaining walls, pergolas, and outdoor lighting systems. We prioritize safety, structural durability, and clean craftsmanship, backing our work with a 100% satisfaction guarantee. If you are ready to elevate your outdoor living space, explore our guide to edging stone options for landscaping and contact us today for your free on-site design consultation and quote.