Don’t Let Your Block Paved Driveway Sink Into the Ground

Stop Block Paving Sinking Before the Dip Gets Worse
To fix block paving sinking, lift the low pavers, find out why the layer beneath has moved, then rebuild and compact that area before relaying the blocks. Adding sand on top may hide a shallow dip for a while, but it will not fix a washed-out sub-base, poor drainage, loose edge restraint, or weak ground.
Start by checking for:
- Standing water, loose blocks, or spreading edges – these point to drainage or restraint problems.
- Wheel-track dips or rocking pavers – these often mean the sub-base has settled under vehicle loads.
- A sudden drop of more than 30 mm within six months – stop and arrange a professional inspection, especially near drains, utilities, or your home’s foundation.
Most sinking starts below the visible surface. A sound driveway needs a stable, compacted foundation, controlled runoff, firm edging, and well-filled joints. Addressing the cause early can prevent a small trip hazard or puddle from becoming a much larger repair.
Primary Causes of Block Paving Sinking
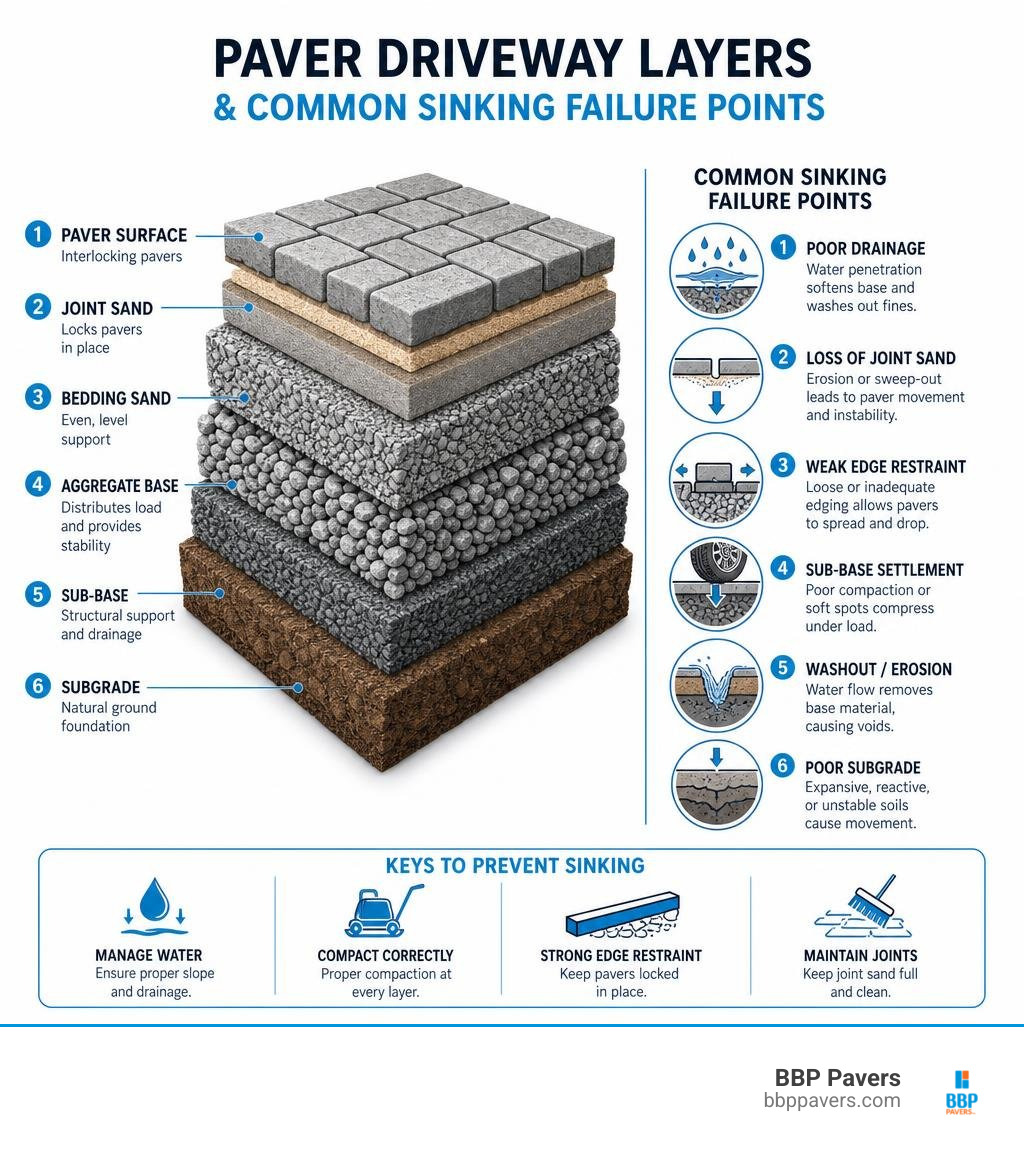
When a block paved driveway starts dipping, the pavers themselves are rarely the culprits. Concrete and clay pavers are durable, load-bearing units designed to last decades. The actual breakdown happens in the layers supporting them. In our network of professional installers, sub-base failure accounts for roughly 70% of all block paving subsidence complaints.
When underlying aggregate is laid too thin, compacted haphazardly, or washed away by subterranean water flow, the entire system loses its load-bearing capacity. Understanding why the ground shifts beneath your driveway is the first step in diagnosing whether you need a quick weekend fix or a deeper structural rebuild. Learning how to avoid common paver installation mistakes helps pinpoint where an existing driveway went wrong.
| Cause of Sinking | Primary Symptoms | Structural Severity | Typical Fix Required |
|---|---|---|---|
| Sub-Base Failure | Deep dips, rocking pavers underfoot, severe puddles | High | Full excavation, adding MOT Type 1, mechanical plate compaction |
| Water Washout | Localized sinkholes, sand loss around drainpipes | High | Repair pipe/drainage, replace aggregate base, relay sand |
| Edge Restraint Failure | Gaps widening near borders, perimeter blocks tilting outward | Medium to High | Re-bedding edge blocks in a concrete haunch |
| Bedding Sand Erosion | Shallow dips, loose blocks, joint sand loss | Medium | Lift blocks, screed fresh sharp sand, re-sand joints |
| Vehicle Load Stress | Parallel tyre ruts (“tramlines”) along parking tracks | Medium | Sub-base reinforcement, re-screeding bedding sand |
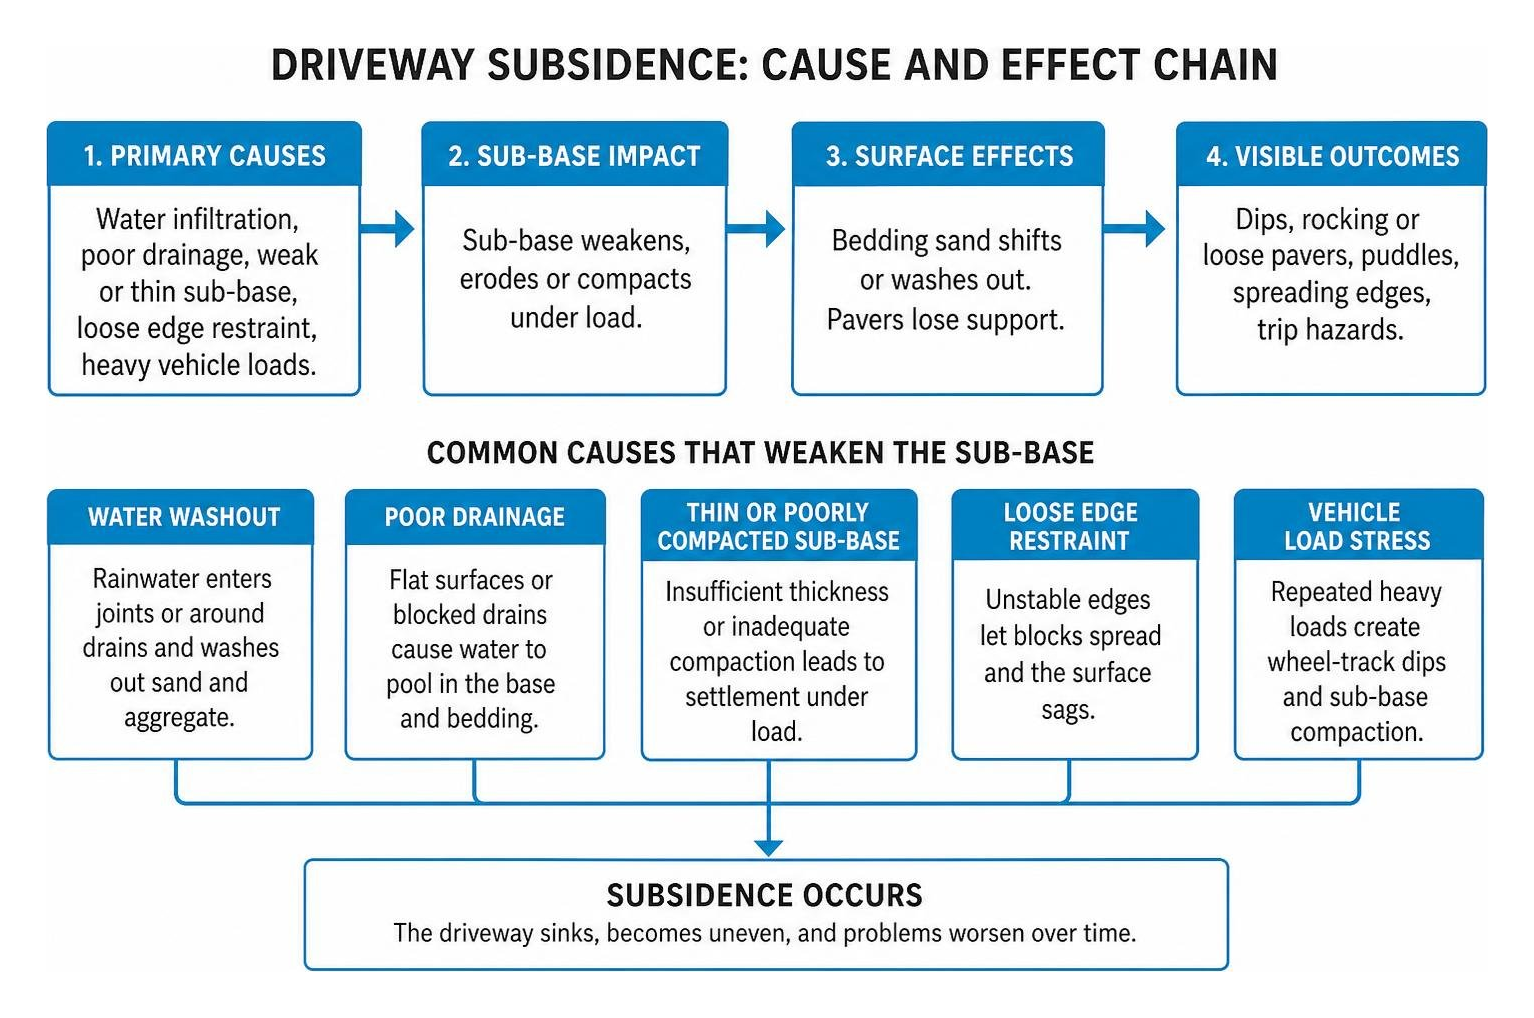
Ground Saturation and Sub-Base Instability
Water is the ultimate enemy of an unsealed hardscape. Interpave technical guidance specifies that a domestic driveway requires a minimum of 100 mm to 150 mm of well-compacted MOT Type 1 crushed stone beneath the bedding layer. When rainwater penetrates the joints without adequate surface slope or a permeable sub-grade, it pools in the bedding sand.
Over time, that trapped water turns fine sand into a slurry, washing it downward into the sub-base voids or carrying it away completely. In areas with expansive clay soil, heavy rain followed by dry spells causes dramatic ground shrinkage and swelling. Without a non-woven geotextile membrane installed between the native sub-grade soil and the stone sub-base, heavy aggregate simply sinks into soft subsoil over time. Executing proper ground and paver preparation prevents this downward migration and preserves driveway elevation across seasonal weather cycles.
Failed Edge Restraints and Lateral Spreading
Interlocking block paving works through lateral tension. When vehicles drive over the surface, the weight pushes outward in all directions. If the perimeter lacks a sturdy concrete haunch or robust edging units, the outer rows begin to drift outward into adjacent lawns or garden beds.
As the edges spread apart, the tight friction between the pavers disappears. The joint sand falls through the widening gaps, leaving individual blocks free to twist, sink, and tilt under vehicle tyres. Applying secure driveway edging methods keeps the perimeter locked in place, ensuring the entire paving field maintains structural integrity.
How to Diagnose Driveway Settlement Before It Spreads
Catching driveway settlement early saves you hundreds of dollars in extensive excavation costs. Routine visual checks after rainfall or heavy vehicle use will reveal subtle structural changes before they evolve into severe vehicle hazards.
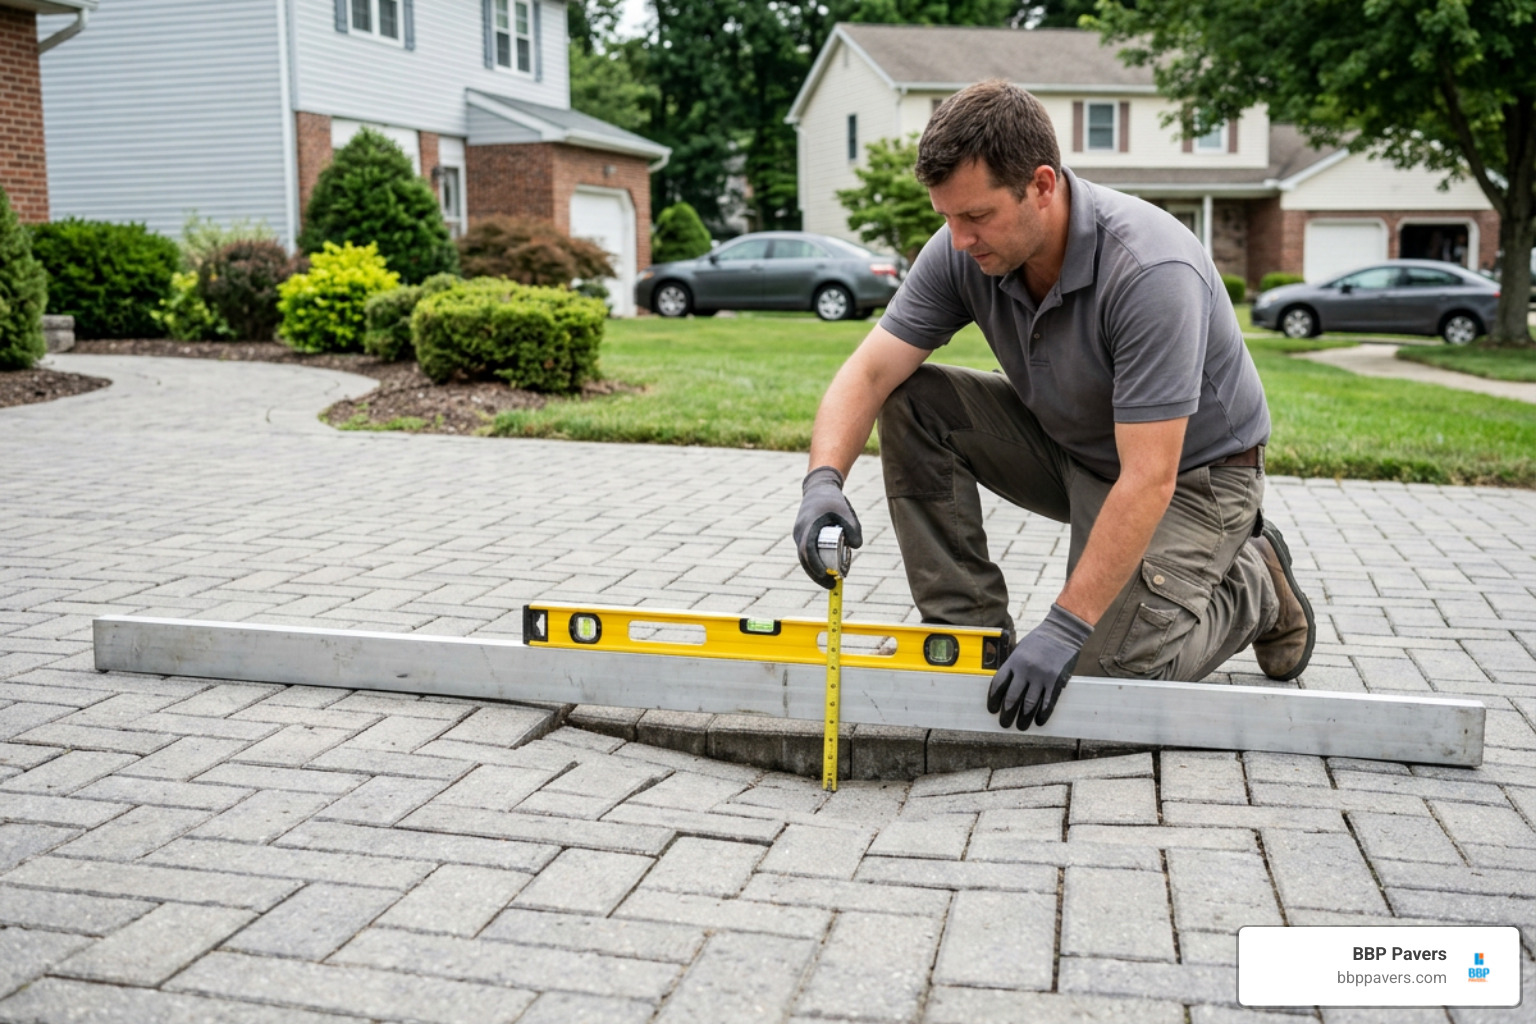
To assess the severity of a sunken patch:
- Place a 2-metre straight edge or long spirit level directly across the depression, bridging the gap between stable, level pavers on either side.
- Measure the gap between the underside of the straight edge and the lowest point of the sunken blocks using a tape measure.
- Check for movement: Step firmly on the blocks within the dip. If they rock, shift, or squelch moisture, the underlying bedding sand has deteriorated.
Emergency Red Flags in Block Paving Sinking
While minor settlement over a ten-year lifespan is normal, certain structural symptoms indicate a serious underground emergency:
- Rapid Drops: A driveway corner or parking area sinking more than 30 mm in under 6 months is an immediate red flag.
- Proximity to Foundations: Dips developing right against exterior house walls can direct rainwater toward the brickwork, leading to damp penetration.
- Underground Utility Leaks: Sunken patches situated near water main covers, drainage inspection chambers, or gas meters often indicate burst pipes washing away the soil below.
- Sudden Sinkholes: Sharp, deep depressions with sudden drops require stopping vehicle traffic immediately to prevent collapse.
Diagnosing Early Stage Block Paving Sinking Under Vehicle Traffic
Vehicle “tramlines”—parallel troughs formed where your car’s tyres travel every day—are the most common early warning sign of driveway fatigue. When driveways support modern heavy vehicles like SUVs or delivery vans, standard daily braking and turning forces concentrate intense downward pressure. If the original sub-base was compacted by hand instead of with a heavy vibrating plate compactor, the aggregate settles unevenly over the first few years of use. Identifying these shallow dips early allows you to lift and re-level small areas before the surrounding interlocking pattern becomes distorted.
Step-by-Step Guide: How to Lift and Level Sunken Driveway Pavers
Fixing a sunken section of block paving is a manageable DIY project for small areas (under 5 square metres), provided you take the time to correct the underlying foundation. Here is how we recommend lifting, rebuilding, and leveling sunken driveway pavers for a lasting repair.
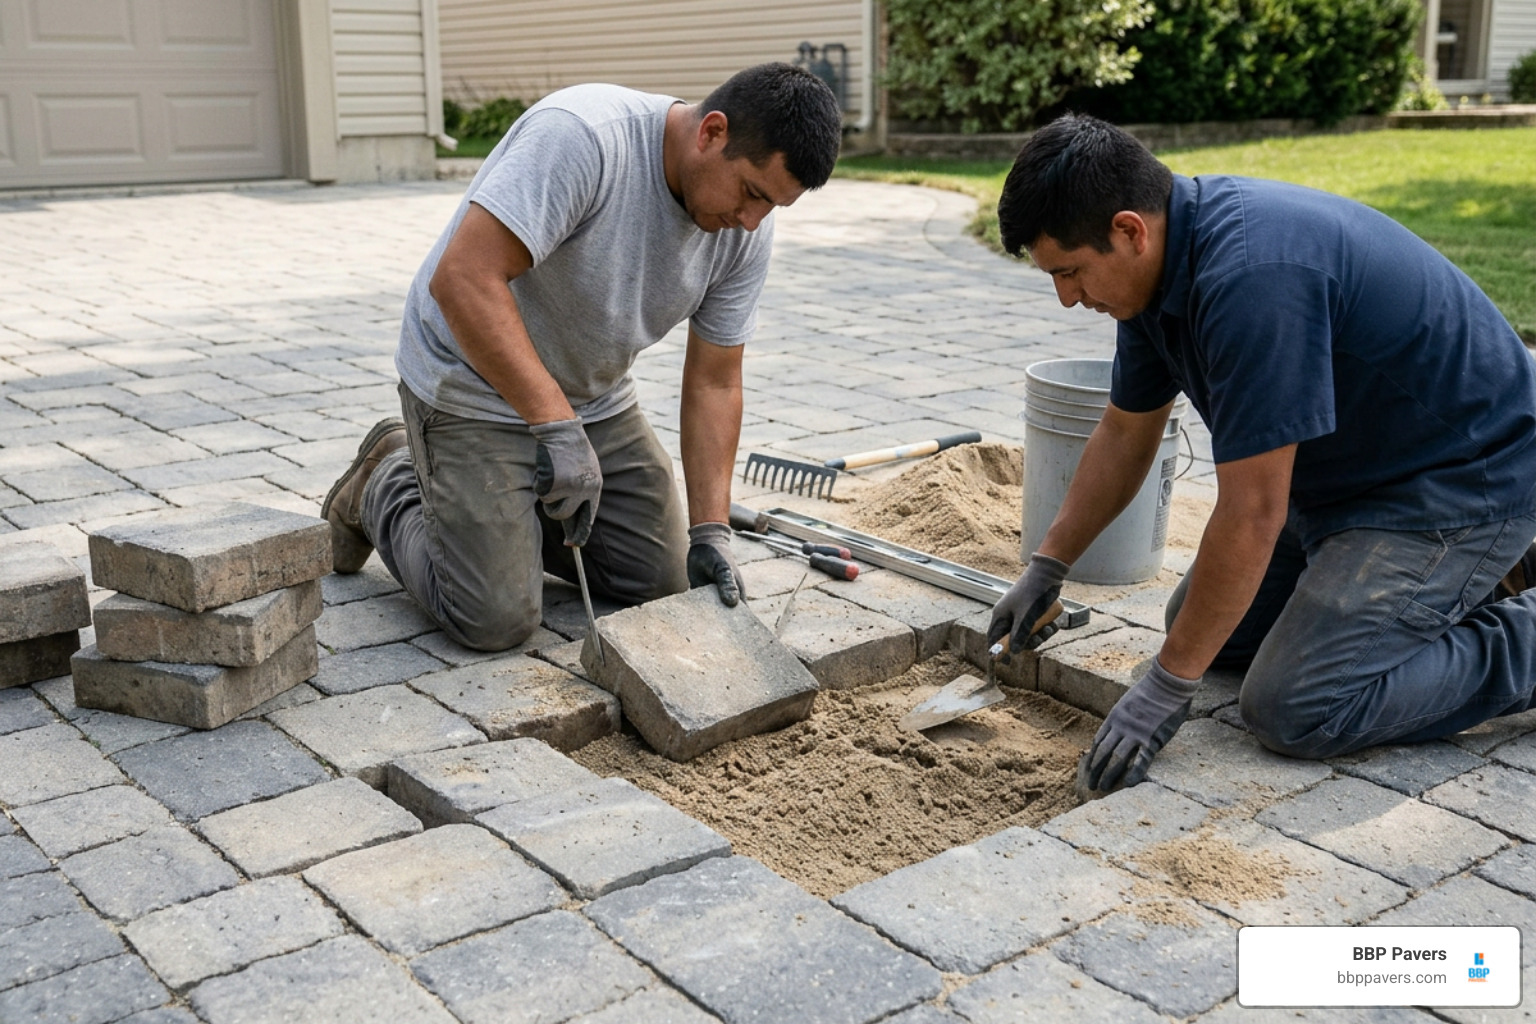
Step 1: Extracting and Cleaning Sunken Pavers
- Choose dry weather: Ensure the forecast is dry for at least 24 to 48 hours. Working with wet sand makes proper compaction and joint filling impossible.
- Pry out the first block: Insert two flat-head screwdrivers into the joints on opposite sides of a paver near the edge of the sunken area. Gently wiggle and lever upward simultaneously until the block clears the adjacent pavers. A dedicated paver extraction tool can also be used if the joints are packed tight.
- Remove surrounding blocks: Work outward from the initial gap, lifting all sunken pavers plus one additional row of stable surrounding pavers. This provides a clean border to blend the repaired area into the existing driveway slope.
- Organize and clean: Stack standard rectangular pavers neatly in crisscross piles. If your driveway features custom-cut perimeter blocks, arrange them in sequential order so you can easily put them back in their exact positions. Use a stiff wire brush and trowel to scrape old dirt, moss, and crusty sand off all sides of every lifted block.
Step 2: Excavating and Restoring the Sub-Base Foundation
- Clear out old bedding sand: Shovel away the loose, contaminated bedding sand to expose the underlying aggregate sub-base. Do not reuse old, muddy bedding sand.
- Inspect the sub-base: Check the exposed aggregate. If the hardcore layer is less than 100 mm thick, loose, or mixed with soft subsoil, dig down further.
- Add MOT Type 1 aggregate: Fill low spots with fresh MOT Type 1 crushed stone (crushed rock ranging from 40 mm down to dust).
- Compact thoroughly: Run a mechanical plate compactor (wacker plate) over the aggregate in multiple overlapping passes, or use a heavy hand tamper for small, confined corners. The sub-base must be solid, level, and sit roughly 65–70 mm below the target finished driveway height (accounting for 50 mm block thickness plus 15–20 mm of compacted sand). Mastering proper paver laying techniques ensures your base layers remain structurally balanced.
Step 3: Screeding Sharp Sand Bedding
- Use coarse sharp sand: Never use soft building sand or play sand for the bedding layer. Sharp sand has angular grains that bind together without turning to mush when wet.
- Set screed rails: Place two parallel timber battens or 20 mm steel screed pipes across the repair zone, adjusting them to match the slope and fall of the surrounding undisturbed paving.
- Level the sand bed: Spread fresh sharp sand evenly between the rails. Pull a straight timber board across the rails to scrape the sand flat and uniform.
- Account for compaction surcharge: Set your loose sand bedding roughly 8–10 mm higher than the surrounding pavers. When the pavers are tapped and compacted into place, the sand layer compresses down to match the surrounding surface seamlessly.
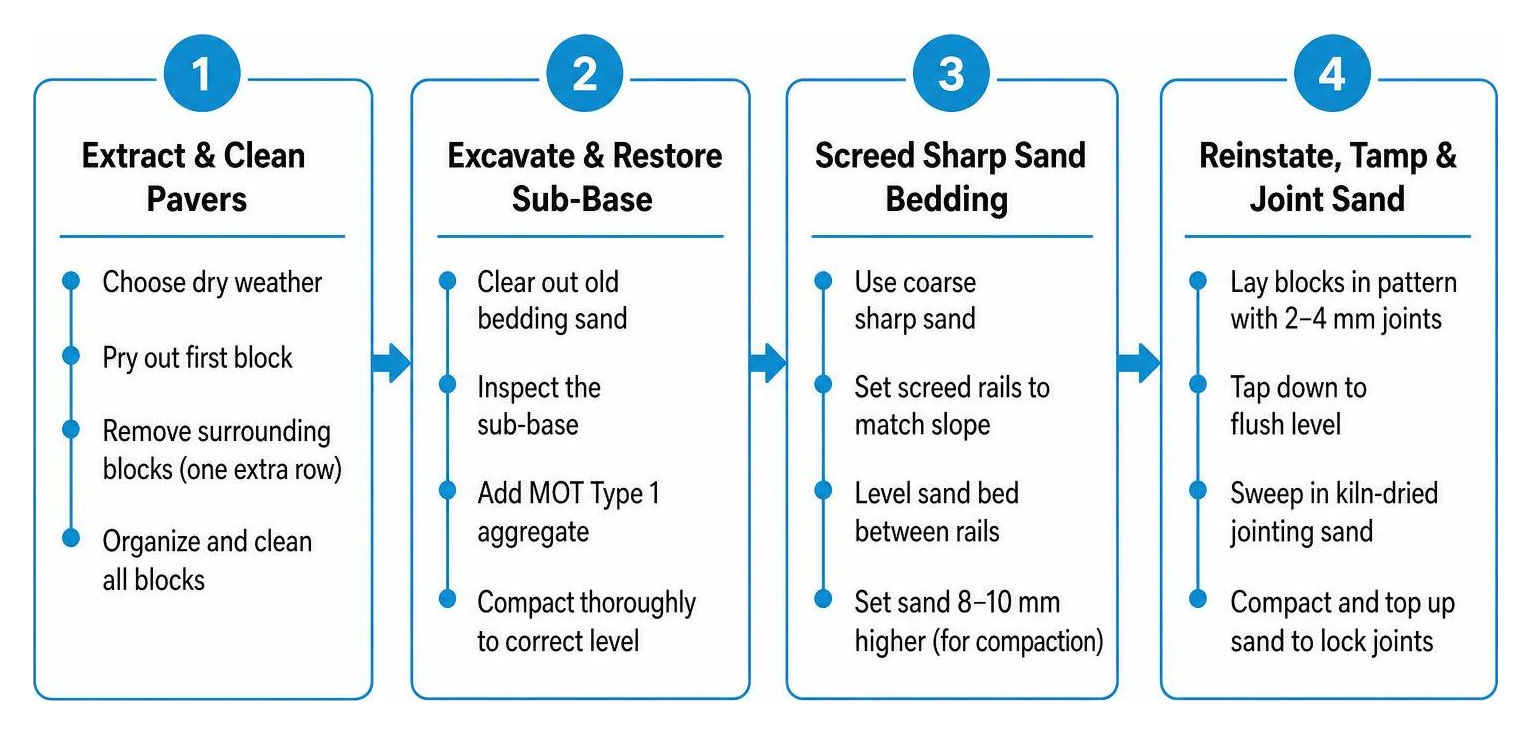
Step 4: Reinstating Blocks, Tamping, and Joint Sanding
- Lay the blocks: Place the cleaned pavers back into their original pattern, maintaining a consistent 2–4 mm joint gap. Work across the patch without dragging blocks across the prepared sand bed.
- Tap into position: Use a rubber mallet and a straight timber plank to tap the pavers down firmly until they sit flush with the adjacent driveway.
- Apply kiln-dried jointing sand: Pour fine, kiln-dried silica sand over the dry pavers. Use a soft broom to sweep the sand diagonally into all joints until they are completely filled.
- Final compaction: Run a plate compactor fitted with a protective rubber base mat over the repair zone, or tamp down firmly with a rubber mallet over a wide wooden board. The vibration locks the sand particles into place. Sweep in a final top-up of kiln-dried sand to fill any voids. Applying a high-grade protective paver sealing product afterwards locks in the jointing sand and protects against water washout.
Long-Term Maintenance to Prevent Driveway Subsidence
Preventing future driveway sinking requires basic, proactive maintenance every year. Neglected joints and unmanaged stormwater runoff are the leading drivers of sub-base erosion.
- Annual Joint Re-Sanding: Around 60% of domestic block paving over 10 years old shows moss or weed growth in joints, which forces sand out of the gaps. Inspect joints annually and replenish missing kiln-dried sand to preserve interlocking friction.
- Maintain Drainage Channels: Clear out driveway channel drains (Aco drains) and catch basins twice a year. If an Aco channel overflows during storms, standing water saturates the bedding layer. Clearing out a blocked drainage channel typically costs between £80 and £150 when handled by a pro, but regular garden hose flushing costs nothing.
- Manage Garden Runoff: Direct downspouts and landscape slopes away from the driveway perimeter. Implementing landscape grading and resolving yard drainage and muddy runoff protects the hardscape foundation from continuous water infiltration.
- Consider Permeable Paving: For areas with poor soil drainage, upgrading to interlocking pavers designed for permeable installations allows heavy rainwater to filter straight into a specialized aggregate sub-base, preventing surface pooling and soil erosion.
Frequently Asked Questions About Sinking Block Paving
Why does my block paving keep sinking in the exact same spot?
When block paving repeatedly sinks in the identical location despite surface re-leveling, the failure lies deeper than the sand bedding layer. Common culprits include an uncompacted sub-base, a ruptured underground drainage pipe slowly washing away fine soil particles, an old tree stump decaying beneath the foundation, or the absence of a geotextile membrane over soft clay subsoil. The area must be excavated down to the native sub-grade to resolve the root void before repaving.
Can I fix sunken pavers simply by pouring sand over the top?
No. Pouring sand over sunken blocks is purely cosmetic and will wash away during the first rainstorm. It does not address the underlying void, lack of compaction, or water saturation causing the pavers to settle. To achieve a permanent fix, you must lift the blocks, restore the compacted sub-base, re-screed fresh bedding sand, and reinstall the pavers to the correct grade.
How much does professional block paving repair cost?
According to 2026 industry pricing, professional lift-and-relay services typically cost £35 to £55 per square metre ($45 to $70/m²), depending on accessibility and site conditions. If the repair requires rebuilding collapsed concrete edge restraints, expect to pay between £350 and £600 ($450 to $780) for perimeter masonry repairs. For confident DIY homeowners, material expenses (sharp sand, MOT Type 1 aggregate, and kiln-dried jointing sand) for a 5-square-metre patch usually run between £80 and £200.
Restore Your Driveway’s Strength and Curb Appeal
Addressing sunken block paving as soon as the first dip appears protects your vehicle, removes dangerous tripping hazards, and prevents localized settlement from turning into an expensive driveway rebuild. By identifying the root cause, reinforcing the stone sub-base, and maintaining locked, well-sanded joints, you can keep your paved surfaces flat, safe, and attractive for decades.
If your driveway requires professional remediation, sub-base engineering, or a complete hardscape makeover, contact BBP Pavers. With over 20 years of local Bay Area expertise, premium materials, and a 100% satisfaction guarantee, we deliver durable, beautiful driveways built to withstand the test of time. Reach out today for our expert driveway design and installation services and request your free consultation and quote.