Affordable Retaining Wall Options to Transform Sloped Yards on a Dime

Affordable Retaining Wall Options to Transform Sloped Yards on a Dime
Cheapest Retaining Wall Options: Start With Cost, Then Build for Drainage
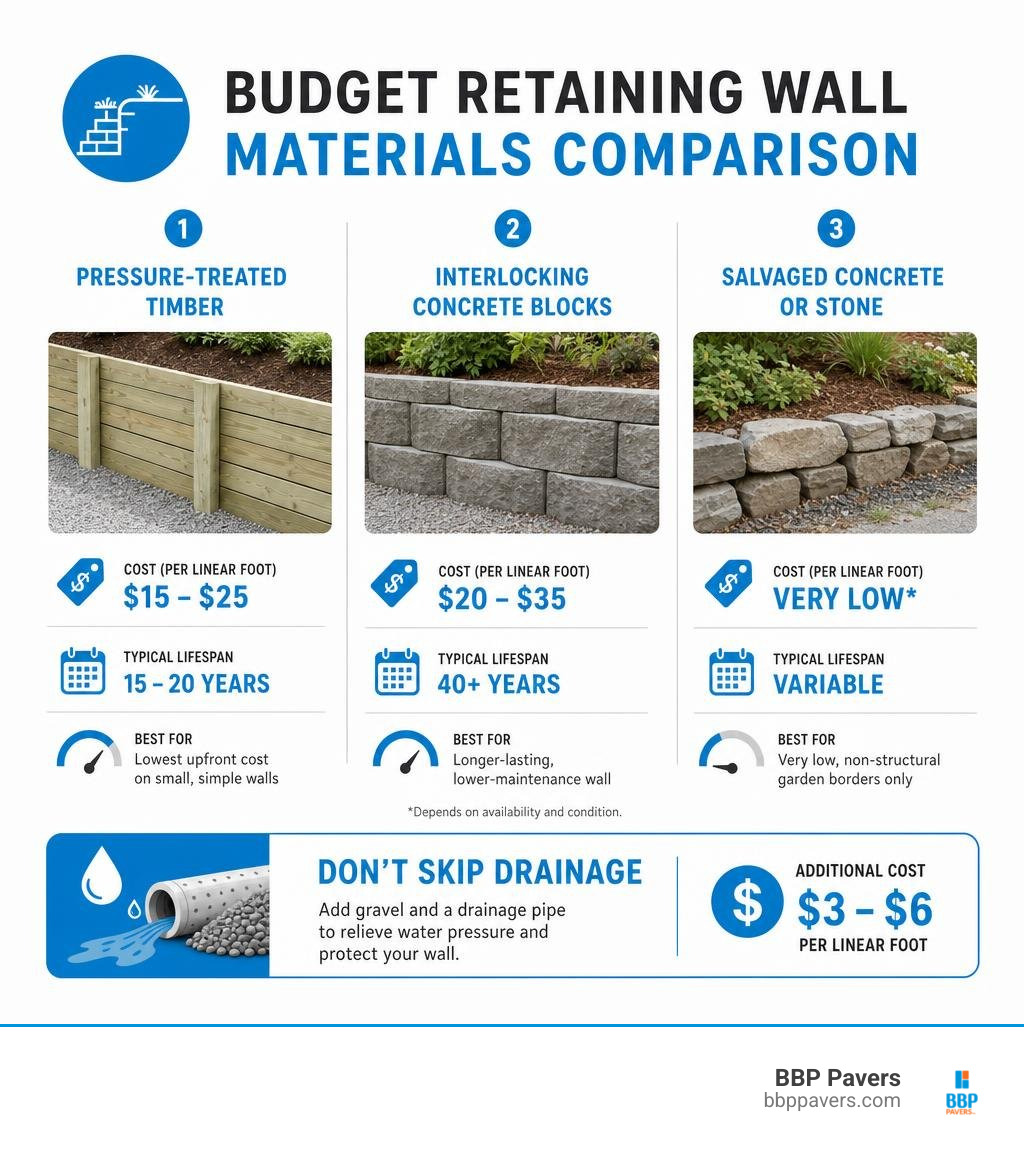
For a short DIY wall, pressure-treated timber is usually the cheapest upfront option, at roughly $15 to $25 per linear foot. Dry-stack concrete blocks cost more, about $20 to $35 per linear foot, but can last 40 years or longer versus about 15 to 20 years for timber.
The best low-budget choice depends on what your sloped yard needs:
- Choose treated timber for the lowest initial cost on a small, simple wall.
- Choose interlocking concrete blocks for a longer-lasting, lower-maintenance wall.
- Use salvaged concrete or stone only for very low, non-structural garden borders unless the material and design are proven suitable.
- Do not skip gravel and drainage pipe. A basic drainage system adds about $3 to $6 per linear foot and helps prevent water pressure from pushing a wall outward.
Cheap materials do not have to mean a short-lived wall. The real savings come from matching the material to the wall height, preparing a compacted gravel base, and giving water a safe way out from behind the wall.
Comparing the Cheapest Retaining Wall Options for Budget Landscaping
When evaluating budget landscaping materials to terrace a hillside or tame backyard erosion, looking strictly at the upfront price tag on a receipt can be deceiving. A truly cost-effective retaining wall balances initial material costs against structural lifespan, ease of installation, and long-term maintenance.
Understanding standard retaining wall installation cost dynamics helps you determine where DIY sweat equity pays off and where cutting corners creates expensive failures. Professional contractors typically charge between $25 and $50 per square foot of wall face for labor and materials combined. Tackling a modest project yourself using affordable structural materials can slash your expenses substantially—provided you choose the right system for your landscape’s demands.
The following comparison table breaks down how the leading budget retaining wall materials stack up across critical metrics:
| Material Option | Typical DIY Material Cost (Per Linear Foot) | Expected Lifespan | DIY Skill Level Required | Primary Advantages | Major Drawbacks / Risks |
|---|---|---|---|---|---|
| Pressure-Treated Timber (6×6) | $15 – $25 | 15 – 20 Years | Intermediate | Lowest upfront cost; lightweight to handle; natural look | Susceptible to rot, warping, and insect damage over time |
| Interlocking Concrete Blocks | $20 – $35 | 40+ Years | Beginner to Intermediate | Mortarless build; built-in setback lips; exceptional longevity | Heavy physical lifting; slightly higher initial purchase price |
| Stacked Concrete Bags | $30 – $70 (installed/prepped) | 20 – 30 Years | Beginner | No precision masonry; conforms to uneven terrain | Industrial/utilitarian appearance; requires careful water curing |
| Salvaged Urbanite (Broken Concrete) | $0 – $10 (transport/tools) | 30+ Years | Intermediate to Advanced | Near-zero raw material cost; prevents landfill waste | Labor-intensive sorting; irregular shapes complicate leveling |
| Reclaimed Red Bricks | $5 – $15 (salvaged/cleaned) | 10 – 15 Years (dry-stacked) | Intermediate | Classic historic aesthetic; easy to source second-hand | Highly porous; prone to freeze-thaw cracking under soil loads |
Let us take a closer look at how each of these affordable materials performs in real-world residential projects.
Pressure-Treated Timber and Reclaimed Lumber: Upfront Cheapest Retaining Wall Options
For homeowners seeking the lowest initial out-of-pocket investment, pressure-treated lumber remains the undisputed upfront champion among budget retaining systems. Sourcing 6×6 pressure-treated timbers or standard 4×6 landscape timbers allows you to construct functional barriers for just $15 to $25 per linear foot in DIY materials.
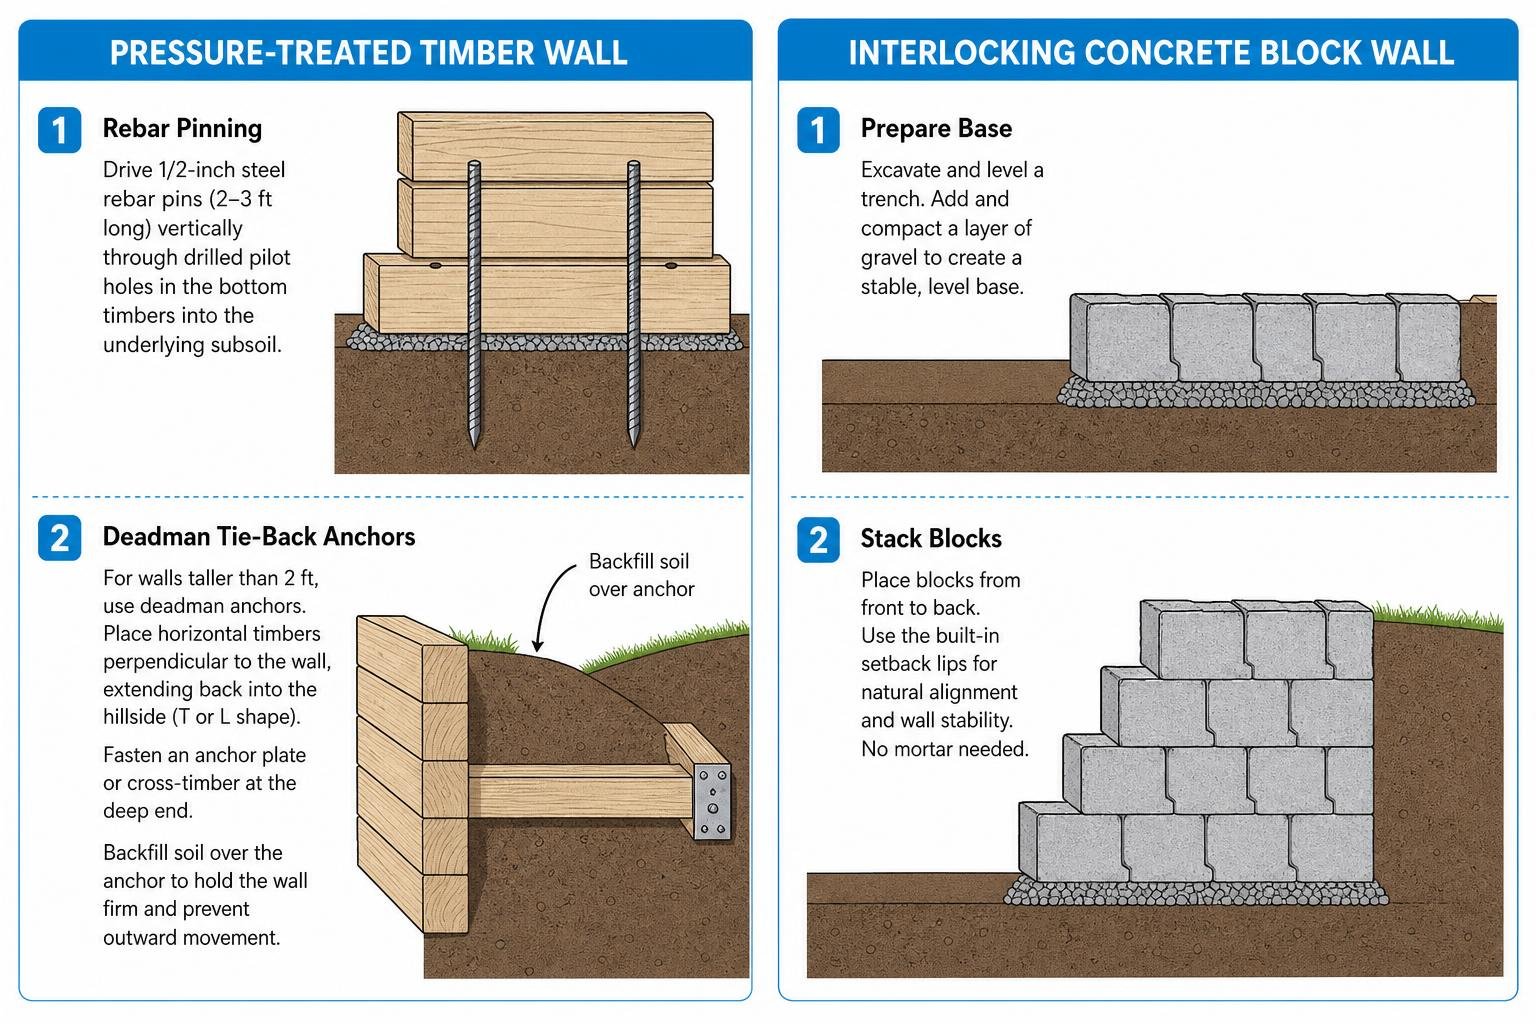
Building a sturdy timber wall involves stacking dimensional wood horizontally and securing each layer to the one below it. While easy to cut and drill, wood walls require structural anchoring that masonry does not:
- Rebar Pinning: To keep the base courses from shifting under lateral soil forces, drive 1/2-inch steel rebar pins (typically 2 to 3 feet long) vertically through drilled pilot holes in the bottom timbers directly into the underlying subsoil.
- Deadman Tie-Back Anchors: Any timber wall taller than 2 feet requires “deadman” anchors. These are horizontal timbers placed perpendicular to the wall face, extending back into the hillside like a “T” or “L”. A buried anchor plate or cross-timber is fastened at the deep end. The weight of the backfill soil resting on top of these anchors physically prevents the timber face from bowing outward under heavy loads.
Despite their low starting cost, timber walls come with an unavoidable trade-off: organic decay. Even heavy industrial preservative treatments cannot stop moisture from eventually causing wood rot, fungal decay, and warping. In wet or humid climates, you can anticipate replacing or rebuilding a timber retaining wall within 15 to 20 years.
Dry-Stack and Interlocking Concrete Blocks: Durable Cheapest Retaining Wall Options
If you want an affordable wall that you will never have to rebuild in your lifetime, segmental, interlocking dry-stack concrete blocks offer the best overall balance of affordability and longevity. While slightly more expensive than lumber at $20 to $35 per linear foot, concrete masonry units do not rot, rust, or attract termites, easily providing an operational lifespan of 40 years or more.
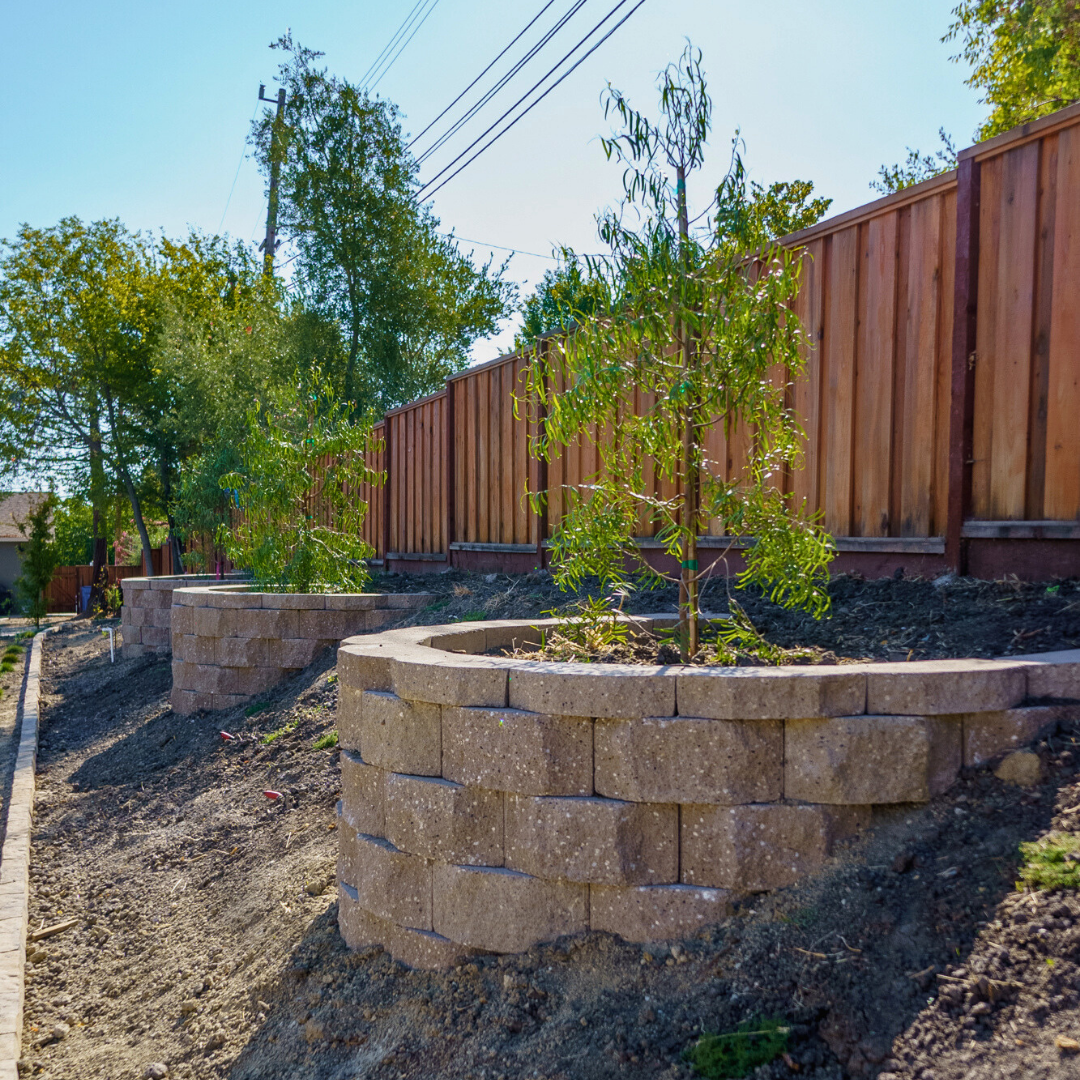
Two popular options readily available at building supply retailers illustrate how affordable segmental blocks can be:
- The Oldcastle Mini Beltis concrete block pallet supplies 378 pieces per pallet for approximately $1,099 ($2.91 per unit), making it an economical choice for small decorative borders, curved garden beds, and terraced steps.
- The Pavestone RockWall interlocking blocks cost roughly $1,949 for a 144-piece pallet covering 46.5 square feet of wall face.
These units feature an engineered rear lip along the bottom edge. When stacked dry without messy wet mortar, the rear lip catches the back edge of the block below it. This automatically sets each course back by a uniform fraction of an inch, creating a built-in backward lean (known as “batter”) toward the retained slope. This built-in angle leverages gravity to counteract lateral soil pressure, turning modular block installation into a beginner-friendly weekend project.
Concrete Bags and Quikrete Sack Walls
An unconventional yet cost-effective alternative for rugged terrain is stacking dry bags of premixed concrete directly in place. Reviewing a detailed cost analysis for low-cost concrete bag retaining walls shows that while contractor-built bag walls can range from $1,500 to $4,000 for a 20-foot run due to heavy labor, pure DIY material costs remain very economical when bags are purchased in bulk.
To build a sack wall:
- Unopened, biodegradable paper bags of standard concrete mix are stacked in overlapping, running-bond rows like large bricks.
- Vertical lengths of steel rebar are driven directly through the dry sacks to pin the rows together.
- Once the wall is erected, the sacks are thoroughly soaked with a garden hose or left to absorb moisture from ambient rainfall and damp backfill.
- Over several days, the concrete hydrates, hardens into monolithic solid “pillows,” and the paper exterior eventually degrades or is washed away with a pressure washer.
Concrete bag walls are ideal for rustic embankments, ditch stabilization, and low garden retention under 2 feet. However, their bumpy, industrial appearance is rarely suited for formal front yards.
Salvaged Materials, Urbanite, and Reclaimed Brick
For homeowners dedicated to thrifty landscaping, utilizing salvaged materials can reduce raw material expenses to near zero:
- Urbanite (Broken Concrete Slabs): Demolished driveways and broken sidewalk pavers can be reclaimed for free from local renovation sites. Stacked flat with the broken, aggregate-rich edges facing forward, urbanite creates a rugged dry-stack wall resembling natural cut flagstone.
- Salvaged Red Bricks: Leftover clay bricks can build charming 1-foot decorative garden borders. However, bricks are naturally porous and lack interlocking tabs. Building a structural retaining wall with standard bricks often leads to water absorption, winter spalling, and sudden blowouts under saturated soil loads.
- Repurposed Wooden Pallets: Pallets can serve as temporary terracing on gentle backyard slopes when driven deep with wooden stakes, though they degrade rapidly within a few rainy seasons.
- Used Railroad Ties: While cheap or free on second-hand marketplaces, old railroad ties are heavily treated with toxic coal-tar creosote. Creosote emits harsh fumes in warm weather, leaches harmful chemicals into garden soil, and should never be used near edible vegetable beds, children’s play zones, or outdoor living spaces.
Critical Construction Steps That Prevent Low-Cost Wall Failure
The biggest threat to any retaining wall—whether built from $2 lumber or $30 designer stone—is not the weight of the dirt itself. It is hydrostatic pressure.
When rain falls, water accumulates in the soil behind the wall face. Water-saturated earth weighs up to two and a half times more than dry earth. Without a dedicated escape route, this trapped liquid pushes relentlessly against the back of your wall until the structure bows, cracks, or collapses completely.

Investing just $3 to $6 per linear foot in a basic drainage and base package will keep your budget wall standing straight for decades. Follow these non-negotiable construction rules:
- Excavate a Proper Trench: Dig a trench deep enough so your first course of block or timber sits below ground level. For a 3-foot wall, bury at least 4 to 6 inches of the base course to prevent the foundation from sliding outward under pressure.
- Compact a Crushed Gravel Base: Never place a retaining wall directly onto native topsoil or soft dirt. Lay down 4 to 6 inches of angular crushed stone (such as 3/4-inch minus gravel), wetting and tamping it until rock-hard with a hand tamper or rented plate compactor.
- Line with Geotextile Landscape Fabric: Drape permeable landscape filter fabric along the back of the excavated trench and up the soil cut before adding your backfill gravel. This prevents fine clay and silt from washing into your drainage gravel and clogging the system.
- Install a Perforated Drain Pipe: Lay a 4-inch perforated PVC or corrugated drain pipe (with the holes facing downward) along the base behind the first course of wall material. Route this pipe to a daylight exit at either end of the wall.
- Backfill with Angular Gravel: Backfill at least 12 inches directly behind the wall with clean, washed angular gravel (not rounded pea gravel or native soil) all the way up to within 6 inches of the top cap.
- Include Weep Holes for Solid Walls: If stacking tight timbers or solid units, drill weep holes through the bottom course every 4 to 6 feet to relieve trapped water.
Following simple seasonal checkups, like our retaining wall concord ca fall maintenance tips, ensures that your drainage channels remain clear of leaf litter and debris before winter storms arrive.
Project Cost Breakdown: Building a 20-Foot Budget Retaining Wall
To put these numbers into practical perspective, let us look at real-world material costs for constructing a standard 20-foot-long residential retaining wall at common DIY heights.
1. The 20-Foot Long by 2-Foot High Wall
- Interlocking Block Approach: Building a 2-foot-tall wall using budget segmental blocks typically requires roughly 80 to 120 blocks (depending on unit dimensions) plus cap stones. Total DIY material costs, including gravel base and backfill, generally run between $500 and $1,000.
2. The 20-Foot Long by 3-Foot High Wall
- Pressure-Treated 6×6 Timber Approach: A 3-foot-tall timber wall requires 6 courses of 6×6 timbers, rebar spikes, and deadman tie-backs. Raw lumber expenses range between $400 and $500. Adding base gravel, drain pipe, and hardware brings the completed DIY total to around $550 to $650.
- Dry-Stack Concrete Block Approach: Building this same 3-foot wall with interlocking modular concrete blocks requires approximately $800 in total materials (roughly $40 per linear foot including drainage gravel, pipe, and masonry adhesive for caps).
When comparing these figures to professional contractor quotes of $1,500 to $3,000 for the same size wall, doing the physical excavation and stacking yourself delivers massive financial savings. If you want to elevate your backyard further, integrating an outdoor seating area or pairing your hardscape with a fire pit and retaining wall design can turn budget-grade materials into a stunning outdoor living destination.
DIY Limits and When to Hire a Professional Hardscape Contractor
While rolling up your sleeves for a 2-foot garden border is manageable for most homeowners, retaining walls are load-bearing civil engineering structures. Exceeding your skill level can result in dangerous property damage or structural failure.
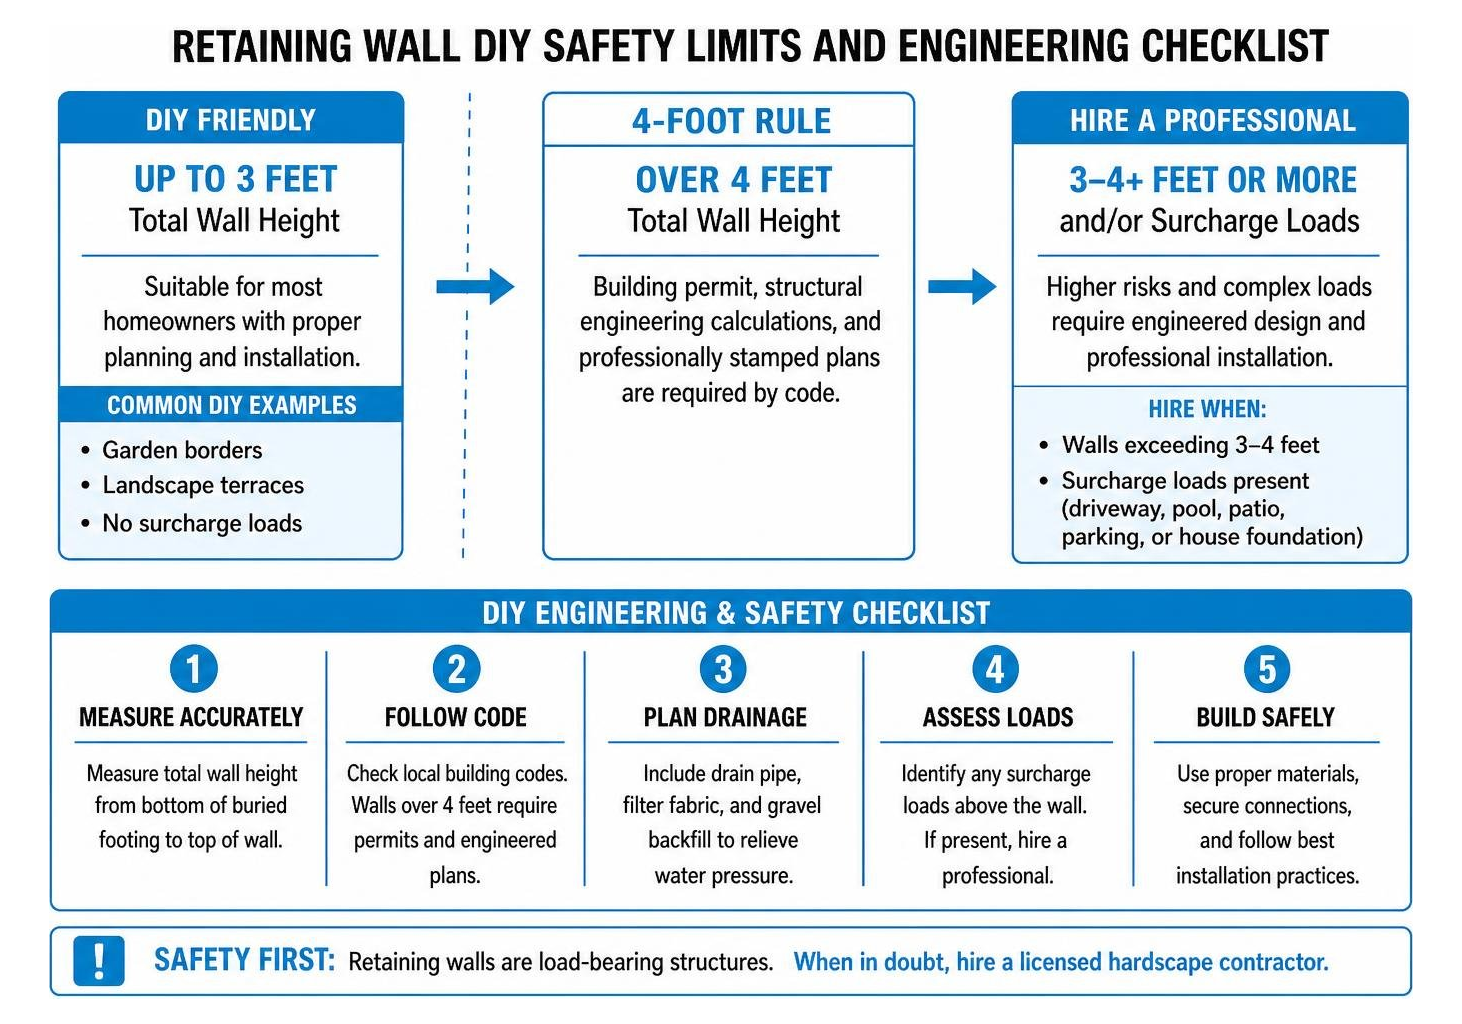
Always observe the 4-Foot Rule: In almost all municipal building codes, any retaining wall exceeding 4 feet in total height (measured from the bottom of the buried footing to the top of the wall) legally requires a building permit, structural engineering calculations, and professional stamped plans.
You should hire a licensed hardscape contractor whenever your project involves:
- Walls Exceeding 3 to 4 Feet: Taller walls experience exponentially greater lateral soil forces that require geogrid soil reinforcement mesh, concrete footings, or heavy equipment.
- Surcharge Loads: If the ground above your wall supports a driveway, parking space, swimming pool, patio, or house foundation, the wall must be engineered to handle heavy live and dead loads.
- Severe Slopes and Water Runoff: Steep hillside cuts with severe drainage issues demand commercial-grade site grading and deep French drain systems to prevent land slippage.
- Property Lines and Utilities: Walls built adjacent to public sidewalks or buried utility lines carry legal liability risks if unexpected movement occurs.
If you are dealing with complex hillside grading or want to ensure lifelong structural stability for a major property feature, partnering with our specialists for a custom retaining wall in concord guarantees professional execution backed by decades of regional soil expertise.
Frequently Asked Questions About Inexpensive Retaining Walls
What is the absolute cheapest material to build a retaining wall?
The absolute cheapest upfront material to purchase is pressure-treated landscape timber or 6×6 dimensional wood, running $15 to $25 per linear foot for DIY builds. If you have access to free salvaged materials, broken concrete slabs (urbanite) can reduce raw material expenses to zero. However, when evaluating the cost over a 30- to 40-year period, dry-stack concrete blocks offer the lowest lifetime cost because they never rot or require replacement.
Can I build a retaining wall directly on top of soil or a concrete slab?
No, you should never build a retaining wall directly on top of raw topsoil or uncompacted dirt. Soil shifts, erodes, and settles unevenly when wet, which quickly causes your wall to lean and crack. You must excavate a shallow trench and compact at least 4 to 6 inches of crushed angular gravel to create a level pad. For specialized installations over existing foundations, read our technical guide on building a retaining wall on concrete slab surfaces.
How high can I build a retaining wall without a permit or engineer?
In most jurisdictions, you can build a retaining wall up to 4 feet in total height (including the buried base course) without a municipal permit or engineered blueprints. However, if your wall supports a sloped driveway, swimming pool, or building structure (known as a surcharge load), local building departments often require engineering permits even for walls under 4 feet. Always verify your local municipal building codes before breaking ground.
Conclusion
Transforming an uneven hillside or creating usable garden terraces does not require draining your emergency savings. By choosing proven modular block systems or treated lumber, preparing a solid gravel foundation, and prioritizing proper drainage, you can build an attractive, budget-conscious retaining wall that stands strong for years to come.
Whether you plan to tackle a simple weekend DIY border or want inspired ideas for your home’s curb appeal, explore our curated retaining wall ideas front yard blog to kickstart your design vision.
When your landscape design calls for larger engineered walls, intricate multi-tiered terraces, or seamless paver integrations, our team at BBP Pavers is ready to help. With over 20 years of Bay Area hardscape expertise, premium materials, and a safety-first approach backed by a 100% satisfaction guarantee, we turn challenging outdoor slopes into enduring outdoor living spaces. Contact us today for your free on-site design consultation and quote!