Paver Installation Preparation: 7 Essential Steps

Have you ever watched a beautifully installed paver driveway or patio start to crack, sink, or shift just a year after installation? In most cases, the problem was not the pavers themselves — it was everything that happened before the first stone was ever laid. Proper paver installation preparation is the single most important factor that determines whether your outdoor surface lasts two years or twenty. In this guide, you will learn exactly what site preparation involves, why each step matters, and how professional contractors like BBP Pavers approach the process to deliver results that stand the test of time. Continue reading to discover how the right preparation transforms a good-looking project into a truly durable investment.
Ready to skip the guesswork? Request your free quote from BBP Pavers today.
What Is Paver Installation Preparation and Why Does It Matter?
Paver installation preparation refers to all the groundwork completed before the first paver is placed. This includes site assessment, excavation, grading, base material compaction, and edge restraint planning. Without this foundation work, even the highest-quality pavers will fail prematurely.
According to the Interlocking Concrete Pavement Institute (ICPI), the majority of paver failures — including cracking, sinking, and shifting — are directly linked to inadequate base preparation rather than defects in the paver material itself. That means skipping or rushing through site prep is not just a minor oversight; it is the root cause of expensive repairs down the road.
Whether you are planning a patio, a driveway, a walkway, or a pool deck, the preparation process follows the same core principles. The surface type and load requirements will influence the depth and materials used, but the sequence of steps remains consistent.
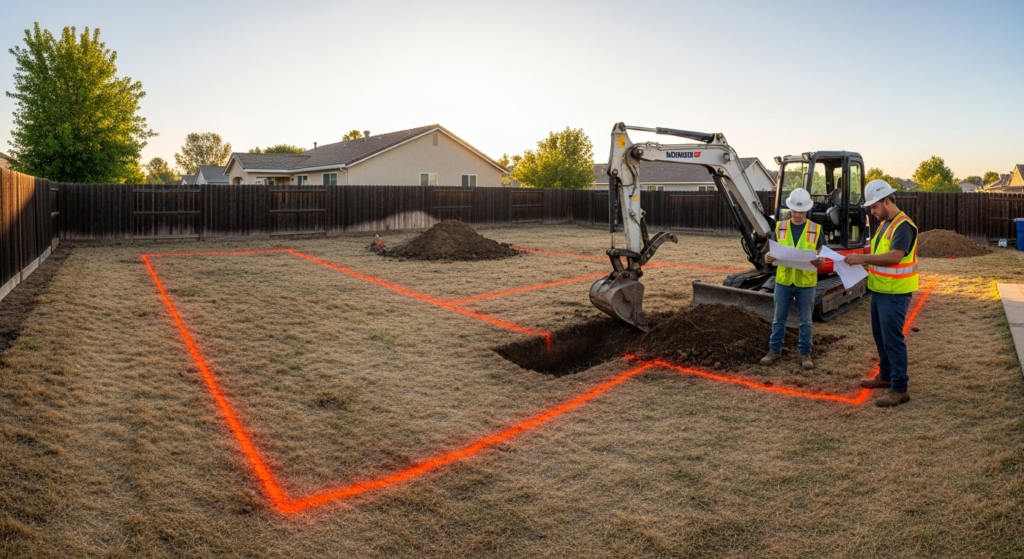
Step 1 — Assess the Site and Define the Project Area
The first phase of any solid paver installation preparation plan is a thorough site assessment. Before any digging begins, a professional contractor will evaluate the following:
Soil type and stability Clay-heavy soils expand and contract with moisture changes, making them particularly problematic for paver bases. Sandy or loamy soils drain better but may require additional compaction. In the Concord, CA area, where BBP Pavers operates, soil conditions vary significantly across neighborhoods, from the clay-rich zones near Clayton Road to the more stable soils in areas like Walnut Creek and Lafayette.
Existing drainage patterns Water must flow away from structures, not toward them. A site assessment identifies low spots, slopes, and areas where water pools after rain. Improper drainage is one of the leading causes of paver base erosion.
Underground utilities Before any excavation, utility lines must be located and marked. In California, contractors are required to call 811 (the national “Call Before You Dig” service) at least two business days before breaking ground. This step is non-negotiable and protects both workers and homeowners.
Existing vegetation and root systems Tree roots and organic material beneath the surface will decompose over time, creating voids that cause pavers to sink. All organic material must be removed during excavation.
Measurements and layout planning Accurate measurements ensure the correct quantity of materials is ordered and that the finished surface aligns with the intended design. This is also when slope calculations are made — a minimum slope of 1/8 inch per foot (approximately 1%) is recommended for proper drainage.
Step 2 — Excavation: How Deep Should You Dig?
Excavation depth is one of the most critical decisions in paver installation preparation. Dig too shallow and the base will not support the load. Dig too deep and you waste materials and labor.
The required excavation depth depends on the intended use of the surface:
| Surface Type | Recommended Excavation Depth | Base Material Thickness | Sand Layer |
|---|---|---|---|
| Pedestrian walkway | 6–8 inches | 4–6 inches | 1 inch |
| Residential patio | 7–9 inches | 5–7 inches | 1 inch |
| Residential driveway | 10–12 inches | 8–10 inches | 1 inch |
| Commercial driveway | 12–16 inches | 10–14 inches | 1 inch |
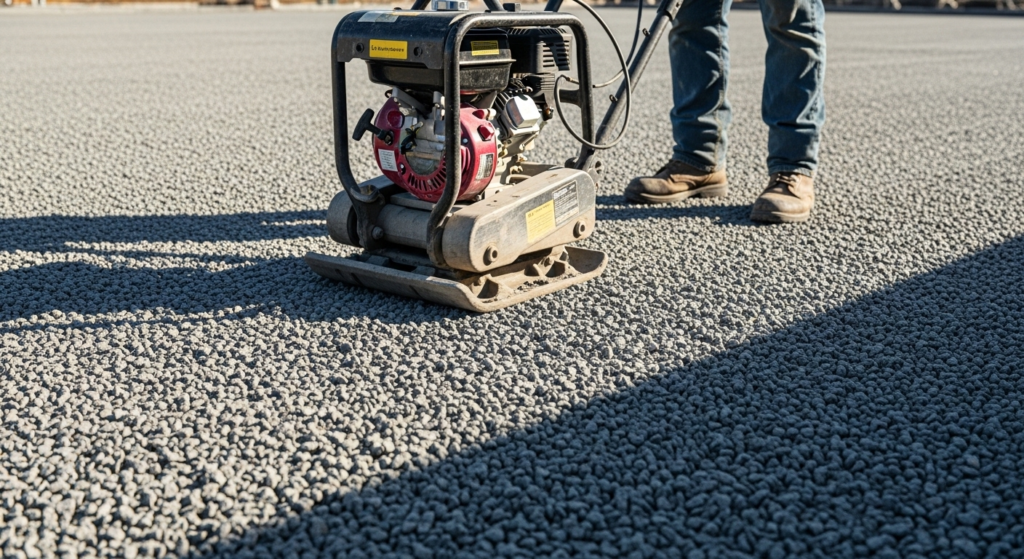
Once excavation is complete, the subgrade — the native soil at the bottom of the excavation — must be compacted using a plate compactor. This step is often skipped by inexperienced installers, but it is essential. A compacted subgrade prevents future settlement and gives the base material a stable platform to rest on.
At BBP Pavers, every excavation is performed with precision equipment and verified for depth consistency across the entire project area. Their team serves homeowners across Concord, Walnut Creek, Lafayette, Orinda, and Fremont, adapting excavation depth to local soil conditions and project requirements.
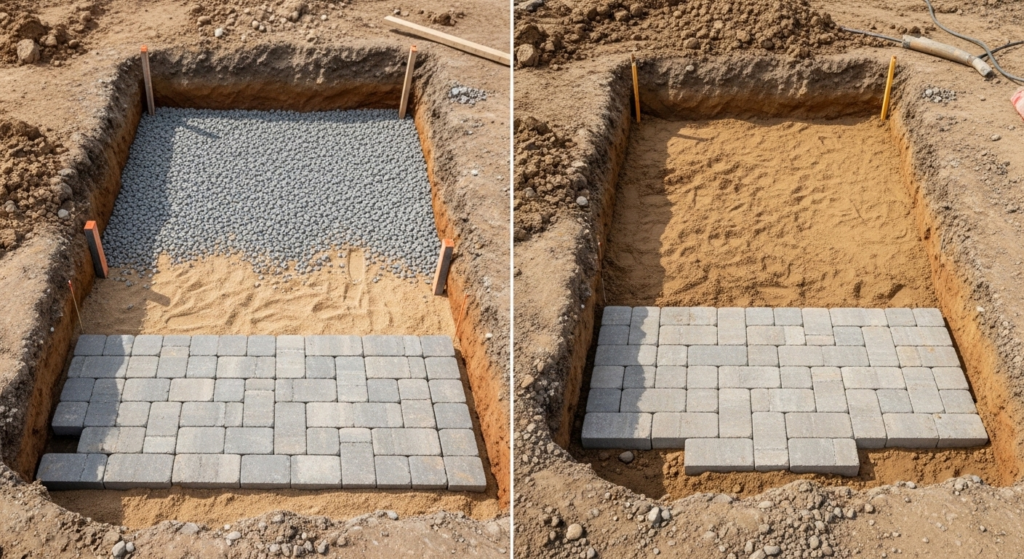
Step 3 — Installing the Aggregate Base: The Foundation of Everything
The aggregate base is the structural heart of any paver system. This layer, typically made of crushed stone or gravel (commonly referred to as Class II base or road base), distributes the load from the surface above and allows water to drain downward rather than pooling beneath the pavers.
Choosing the right base material
Crushed angular stone — not rounded gravel — is the preferred material for paver bases. Angular particles interlock when compacted, creating a dense, stable layer. Rounded pea gravel, by contrast, shifts under load and should never be used as a primary base material.
The most commonly used aggregate for paver installation preparation in California is Class II Aggregate Base (AB), a crushed granite blend that compacts well and provides excellent drainage.
Compaction in lifts
Base material should never be dumped in one thick layer and compacted all at once. Instead, it must be installed in lifts — layers of 3–4 inches — with each lift compacted separately using a plate compactor before the next is added. This ensures uniform density throughout the entire base depth.
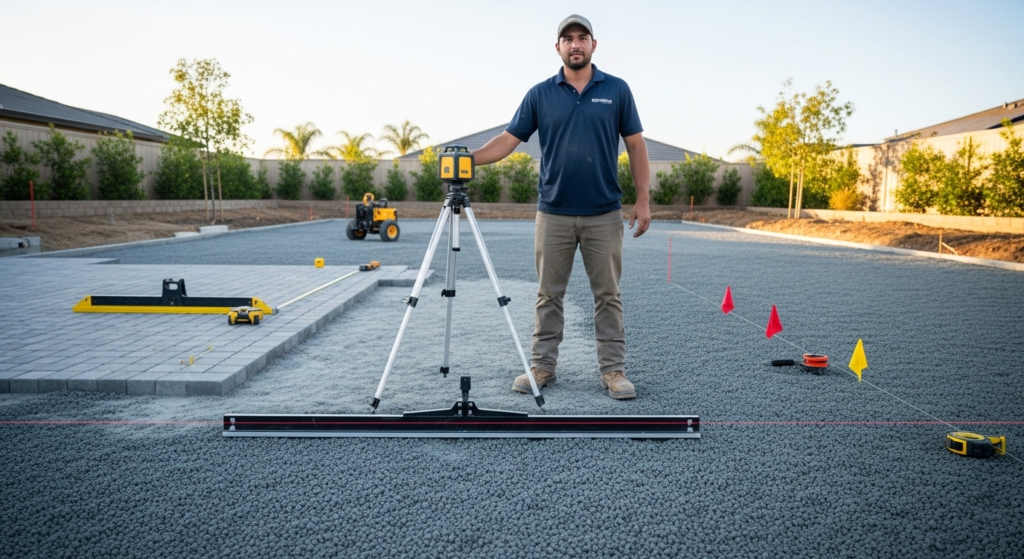
Checking for level and slope
After compaction, the base surface must be checked with a long straightedge or screed board to confirm it is level across the width and sloped correctly for drainage. Any high or low spots must be corrected before moving forward.
Step 4 — Geotextile Fabric: Should You Use It?
Geotextile fabric (also called landscape fabric or filter fabric) is placed between the native soil and the aggregate base in certain conditions. Its purpose is to prevent fine soil particles from migrating upward into the base material — a process called pumping — which can compromise the base over time.
When to use geotextile fabric:
- When native soil is clay-heavy or silty
- When the water table is relatively high
- When the project area has a history of drainage problems
- When building over soft or unstable subgrade
When it may not be necessary:
- When native soil is sandy and well-draining
- When the base depth is substantial and soil conditions are stable
In the Bay Area, where clay soils are common in many neighborhoods, BBP Pavers frequently incorporates geotextile fabric as a standard part of their paver installation preparation process. This small addition significantly extends the life of the base and reduces the risk of long-term settling.
Step 5 — Bedding Sand Layer: Precision Matters Here
Once the aggregate base is compacted and verified, a 1-inch layer of coarse bedding sand is screeded over the surface. This layer serves as the final leveling medium and allows the pavers to be set at the correct height and slope.
Important rules for the bedding sand layer:
- Use coarse, angular concrete sand — not fine beach sand or mason sand
- The layer must be exactly 1 inch thick — no more, no less
- Do not compact the sand before laying pavers; it must remain loose so pavers can be set and adjusted
- Do not walk on or disturb the screeded sand before pavers are placed
The bedding sand layer is one of the most misunderstood elements of paver installation preparation. Many DIY installers make the mistake of using too much sand, thinking a thicker layer will make leveling easier. In reality, a sand layer thicker than 1 inch will compress unevenly under load, causing the surface to become wavy over time.
Screed rails or pipes are used to guide the screed board across the surface, ensuring a perfectly consistent 1-inch depth. This technique requires practice and precision — another reason why professional installation from a company like BBP Pavers delivers results that DIY attempts often cannot match.
Step 6 — Edge Restraints: Keeping Everything in Place
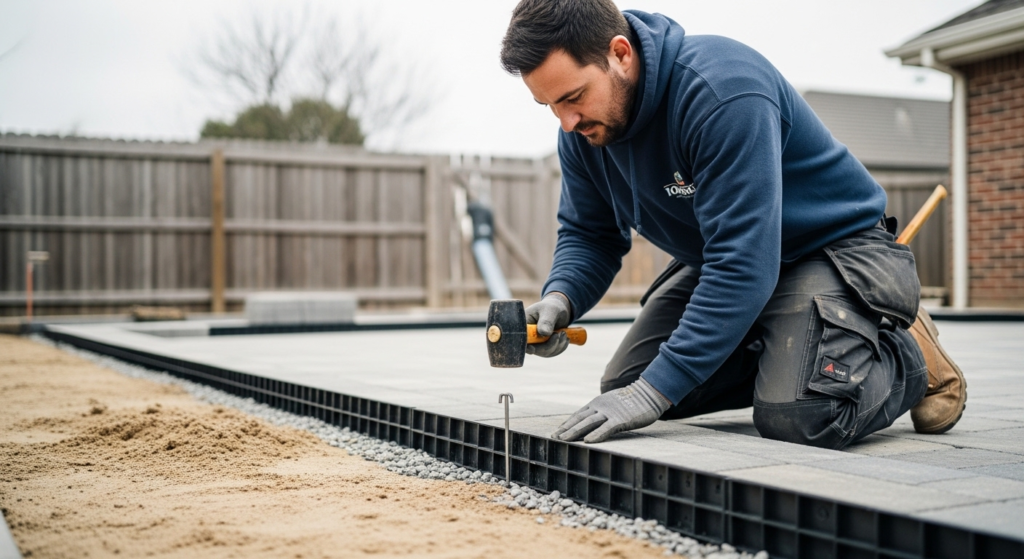
Edge restraints are the unsung heroes of a long-lasting paver installation. Without them, pavers at the perimeter of the surface will gradually migrate outward under load and freeze-thaw cycles, causing the entire surface to spread and gaps to open between stones.
Types of edge restraints:
- Plastic snap-together edging (most common for residential projects)
- Aluminum or steel edging (preferred for curves and high-load areas)
- Concrete curbing (used for driveways and commercial applications)
- Natural stone or brick borders (aesthetic option that also functions as restraint)
Edge restraints must be secured with spikes driven into the aggregate base at regular intervals — typically every 12 inches for straight runs and every 6 inches on curves. The top of the restraint should sit flush with or just below the finished paver surface.
Proper edge restraint installation is a critical component of paver installation preparation that is often overlooked in budget installations. At BBP Pavers, edge restraints are selected based on the specific project type — whether it is a driveway, patio, or walkway — to ensure the finished surface remains stable for decades.
Step 7 — Final Grade Check and Drainage Verification
Before the first paver is placed, a final inspection of the prepared site is essential. This is the last opportunity to catch and correct any issues that could compromise the finished installation.
Final pre-installation checklist:
- Subgrade is compacted and free of organic material
- Aggregate base is at the correct depth and uniformly compacted
- Base surface is sloped correctly (minimum 1% away from structures)
- Geotextile fabric is in place where required
- Bedding sand is screeded to exactly 1 inch
- Edge restraints are installed and secured on all sides
- No standing water or soft spots are present in the base
This final verification step is what separates a professional paver installation preparation process from a rushed job. Taking an extra hour at this stage can prevent thousands of dollars in repairs later.
Common Paver Preparation Mistakes and How to Avoid Them
Even experienced contractors occasionally cut corners during site preparation. Here are the most common mistakes and how to avoid them:
Mistake 1: Insufficient excavation depth Digging too shallow leaves inadequate room for the base and sand layers, resulting in pavers that sit too high or a base that is too thin to support the load. Always verify depth with a measuring tape at multiple points across the excavation.
Mistake 2: Using the wrong base material Rounded gravel, topsoil, or recycled concrete debris are not suitable substitutes for proper crushed aggregate base. Using the wrong material leads to uneven settling and drainage problems.
Mistake 3: Skipping subgrade compaction Compacting only the aggregate base without first compacting the native subgrade is a common shortcut that leads to long-term settlement. Both layers must be compacted.
Mistake 4: Ignoring drainage A flat or improperly sloped surface will trap water, which erodes the base and causes frost heave in colder climates. Always verify slope before laying pavers.
Mistake 5: Too much bedding sand As mentioned earlier, a sand layer thicker than 1 inch will compress unevenly. Stick to the 1-inch standard without exception.
Mistake 6: No edge restraints Skipping edge restraints to save money is a false economy. Without them, the perimeter pavers will migrate and the entire surface will eventually need to be reset.
Tools and Equipment Needed for Proper Site Preparation
Professional paver installation preparation requires the right tools. Here is what contractors use on a typical residential project:
- Plate compactor (gas-powered, minimum 3,000 lbs of compaction force)
- Excavator or skid steer (for larger projects)
- Hand tamper (for tight corners and edges)
- Laser level or transit level
- Screed pipes or rails (typically 1-inch diameter)
- Screed board (straight aluminum or wood)
- Measuring tape and marking paint
- Wheelbarrow and shovels
- Rubber mallet
- Safety equipment (gloves, eye protection, steel-toed boots)
For homeowners considering a DIY approach, plate compactors can be rented from most equipment rental companies. However, the skill required to properly assess soil conditions, calculate drainage slopes, and achieve consistent compaction across a large area is significant. Most homeowners in the Bay Area find that professional installation from a company like BBP Pavers delivers better long-term value than attempting the work themselves.
Real Project Example: Patio Transformation in Concord, CA
One of BBP Pavers’ recent projects in Concord illustrates exactly why thorough site preparation makes all the difference. A homeowner on Clayton Road had a concrete patio that had cracked and settled significantly over 15 years. When the BBP Pavers team excavated the area, they discovered that the original installation had only 2 inches of base material — far below the recommended 5–7 inches for a residential patio.
The team excavated to the proper depth, removed all organic material from the subgrade, installed geotextile fabric over the clay-heavy native soil, and built up a full 6-inch compacted aggregate base in two lifts. The finished patio, installed with premium concrete pavers, has now been in place for three years without a single issue.
As one satisfied customer noted in their Google review:
“BBP Pavers did an outstanding job on our patio. The crew was professional, thorough, and clearly knew what they were doing. They explained every step of the process, including all the prep work, which gave us a lot of confidence. The finished result is absolutely beautiful and rock solid.” — Maria T., Concord, CA
Another customer from Walnut Creek shared on Yelp:
“I had gotten quotes from three other companies before BBP Pavers. They were the only ones who took the time to explain the importance of proper base preparation and showed me exactly what they would do differently. Two years later, our driveway looks as perfect as the day it was installed.” — James R., Walnut Creek, CA
These results are consistent across BBP Pavers’ service area, which includes Moraga, Palo Alto, Los Altos, and Atherton.
Thinking about a paver project? Explore BBP Pavers’ full range of services and find the right solution for your property.
How Paver Preparation Differs by Project Type
Not all paver projects require identical preparation. Here is a quick comparison of how paver installation preparation varies by surface type:
| Project Type | Key Preparation Considerations | Recommended Base Depth |
|---|---|---|
| Patio pavers | Drainage away from house foundation, soil stability | 5–7 inches |
| Driveway pavers | Heavy load capacity, vehicle turning stress | 8–10 inches |
| Walkway pavers | Foot traffic only, narrower edge restraint needs | 4–6 inches |
| Pool deck pavers | Chemical resistance, slip resistance, drainage | 5–7 inches |
| Retaining wall base | Lateral load, drainage behind wall | 6–12 inches |
For more detail on specific project types, visit BBP Pavers’ dedicated service pages for patio pavers, driveway pavers, walkway pavers, and pool decks.
Paver Installation Preparation: DIY vs. Professional Installation
Many homeowners wonder whether they can handle site preparation themselves. Here is an honest comparison:
DIY Preparation
Pros: Lower upfront cost, personal satisfaction, flexibility in scheduling.
Cons: Risk of improper compaction, incorrect slope, inadequate base depth, and costly mistakes that require professional correction later. Equipment rental adds cost. Physical labor is significant.
Professional Preparation
Pros: Correct technique, proper equipment, experience with local soil conditions, warranty coverage, faster completion, and long-term reliability.
Cons: Higher upfront cost.
For most homeowners, the math favors professional installation. A failed DIY base that requires correction typically costs more to fix than the original professional installation would have cost. BBP Pavers offers financing options to make professional installation accessible, and their work is backed by a comprehensive warranty.
Frequently Asked Questions About Paver Installation Preparation
How deep should I excavate for paver installation?
Excavation depth depends on the intended use. For pedestrian walkways, 6–8 inches is standard. Residential patios require 7–9 inches, and driveways need 10–12 inches. These depths accommodate the aggregate base, bedding sand, and paver thickness. Always measure from the finished surface elevation and work downward to determine the correct excavation depth.
What is the best base material for pavers?
The best base material for pavers is crushed angular aggregate, commonly called Class II Aggregate Base or road base. It compacts tightly, drains well, and provides a stable platform. Avoid rounded gravel, topsoil, or sand as primary base materials, as they do not compact properly and will shift under load.
Do I need to compact the soil before adding base material?
Yes. Compacting the native subgrade before adding base material is essential. Skipping this step is one of the most common causes of long-term paver settlement. Use a plate compactor to achieve at least 95% compaction of the subgrade before placing any aggregate.
How thick should the bedding sand layer be for pavers?
The bedding sand layer should be exactly 1 inch thick. This is a critical specification. A thicker layer will compress unevenly under load, causing the surface to become uneven over time. Use screed pipes to maintain consistent depth across the entire project area.
Can I install pavers without edge restraints?
Technically yes, but it is strongly discouraged. Without edge restraints, pavers at the perimeter will gradually migrate outward under load, causing gaps and instability across the entire surface. Edge restraints are a low-cost component that dramatically extends the life of any paver installation.
How long does paver installation preparation take?
For a typical residential patio of 400–600 square feet, site preparation takes one to two days. Larger projects like driveways may require two to three days of preparation work before paver laying begins. Rushing this phase to save time is the most common cause of premature paver failure.
Conclusion: Get the Foundation Right and Everything Else Follows
Proper paver installation preparation is not glamorous work. It happens underground, out of sight, and it does not make for impressive before-and-after photos. But it is the single most important factor in determining whether your paver project looks great and performs reliably for decades — or starts showing problems within the first few years.
The seven steps covered in this guide — site assessment, excavation, aggregate base installation, geotextile fabric placement, bedding sand screeding, edge restraint installation, and final grade verification — represent the professional standard for paver preparation. Each step builds on the last, and skipping any one of them introduces risk into the entire system.
At BBP Pavers, every project begins with a thorough site assessment and follows a proven preparation process refined over years of work across Concord, Walnut Creek, Lafayette, Moraga, Orinda, Fremont, Los Altos, Palo Alto, and Atherton. Their team understands local soil conditions, drainage patterns, and the specific demands of Bay Area weather — knowledge that translates directly into installations that last.
If you are planning a paver project and want it done right from the ground up, the BBP Pavers team is ready to help. Visit their FAQ page for more answers, learn about their approach to pavers, or explore their full service offerings.
Ready to start your paver project in Concord or the surrounding Bay Area? Contact BBP Pavers today for a free, no-obligation estimate. Call +1 844-497-3321, email bbppavers@gmail.
Follow BBP Pavers on Facebook, Instagram, and Pinterest for project inspiration and updates. Read verified customer reviews on Google Maps and Yelp.
BBP Pavers 4918 Clayton Rd, Concord, CA 94521, United States Phone: +1 844-497-3321 Email: bbppavers@gmail.